How To Use Pytest With Selenium For Web Automation Testing
As a website test automation engineer, have you ever struggled with repeatedly doing the same UI/UX actions?
Human manual testing is error-prone, time-consuming and in fact… just boring.
It also lacks scale - testing time grows linearly with complexity and number of tests.
Feedback is slow and fairly manual, introducing many unknown variables due to human senses and memory.
So how can you improve this? How can you automate Web Browser UI testing?
Well, there are several tools in the market, most notably Selenium.
Selenium is a popular Web Browser automation that allows your to simulate website interactions with code.
Now combine that with all you’ve learnt on Pytest and you’ll quickly discover what a game changer that is.
In this article, you’ll learn how to run basic Web Browser UI tests using Pytest and Selenium.
We’ll first look at a basic title check example, then run a DuckDuckGo search, test webpage logins and use the pytest-selenium plugin to achieve similar objectives (in a simpler more “Pytesty” way).
Lastly, you’ll also learn more about the Page Object Model design principle and how to use this in your projects, or at work in a production setting, whatever your need is.
You can combine it with Pytest fixtures, parameters and much more to scale and automate Web Browser UI testing.
So let’s get started. If you’re feeling itchy, feel free to check out the code directly.
Why Web UI Automation Testing is Important?
If you don’t have huge experience in Web UI/UX development, you may be wondering… why do I need automation to test the Web UI?
Can’t we just pay a bunch of people to go do specific tasks on the Web UI and come back with a bug report?
Well, that’s not the most optimum solution.
Computers are incredible at doing repetitive tasks with very high precision.
While backend unit, end-to-end, integration, regression, and functionality testing are very important — so is Web User Interface or experience testing.
It focuses on verifying the visual and interactive bits of a website, ensuring your users can interact with it as intended across different devices and browsers.
- User Satisfaction: A well-functioning UI is essential for user satisfaction, prevents frustration and ensures a positive user experience.
- Cross-Platform Compatibility: With the plethora of devices and browsers available today, ensuring your application looks and works consistently across all platforms is vital.
- Brand Reputation: The quality of your web UI reflects your brand. A smooth, bug-free user interface enhances your brand’s reputation, while issues can lead to negative perceptions.
- Agile Development Support: In agile environments, features are rapidly developed and deployed. Web UI testing ensures that these new features integrate seamlessly without affecting your existing user experience.
Overall, Web UI testing is as much about keeping your users happy as it is about catching bugs.
Selenium WebDriver Overview
Let’s take a short tour down memory lane on Selenium.
Selenium WebDriver is an open-source automation tool designed for web application testing.
It emerged from the limitations of its predecessor, Selenium Remote Control (RC), offering a more efficient way to control browsers programmatically.
Founded in 2004 by Jason Huggins, Selenium WebDriver was created out of the need for an automated testing tool that could interact with a web page as a user would, including clicking links, filling out forms, and validating text.
Selenium WebDriver became part of the Selenium Suite, revolutionizing web testing by providing a unified interface to write test scripts that work across different browsers seamlessly.
Its adoption skyrocketed due to its ability to integrate with programming languages like Java, Python, C++ and C#, making it accessible to a broad range of developers and testers.
Today, Selenium WebDriver supports multiple browsers, including Chrome, Firefox, and Safari, and operates on various operating systems.
Its utility in executing tests in parallel, across different environments, significantly reduces the time for feedback cycles in CI/CD workflows.
This, along with being open-source and extensive community support, makes Selenium WebDriver one of the most popular and widely used tools today.
Challenges with Web UI Testing
OK, so the importance of Web UI testing in your CI/CD Pipelines is clear.
However, Web UI testing comes with its own set of challenges that are important to address.
- Slowness — One of the most notable issues is the inherent slowness. Tests often require interacting with the web interface in real-time, simulating user actions which can be time-consuming.
- Debugging Challenges — Unlike unit tests that can precisely pinpoint failures within the code, Web UI tests lack this granularity, making it difficult to identify the root cause of issues.
- Flaky Tests — Web UI tests can be flaky, meaning their outcomes can vary between runs without changes to the code. This inconsistency can be due to various factors, like network delays, browser inconsistencies, or dynamic content taking ages to load or simulating varying user actions.
- Dynamic Content: Modern web applications may contain dynamic content that changes in response to user actions or events. Testing these elements can be difficult as the content may not be present at all times.
- Test Maintenance: As applications evolve, their UIs change, which can lead to a high maintenance cost for tests. Updating tests to align with new UI elements can be time-consuming and requires constant vigilance.
While you can address some of these challenges with Selenium and Pytest, you still need more sophisticated tooling, especially for mobile or tablet testing.
Having learnt so much about the need for Web UI testing, let’s get your hands dirty doing the cool stuff.
The Arrange, Act, Assert Model
I wanted to take the opportunity to introduce a common test design pattern.
Something we’ve not talked about previously on this website, although we have been using it in practice.
The Arrange, Act, Assert (AAA) model is a simple yet powerful pattern for structuring tests.
This model breaks down a test case into three clear sections:
Arrange:
In this initial step, you set up the conditions for your test.
This involves initializing objects, setting up fixtures, and hooks, configuring mocks or stubs, and preparing any data needed for the test.
Act:
This step involves executing the functionality you’re testing.
It’s the core action that triggers the behaviour you want to verify.
This could be a function call, a method execution, or any operation that produces an outcome based on the arranged conditions.
Assert:
The final step is where you verify the outcome of the action.
You check whether the actual results match your expected results, using assertions to validate the behaviour of your code under test.
By clearly separating the setup, execution, and verification phases of a test, you enhance clarity and ensure that each test focuses on a single behaviour, following the best practices of test-driven development (TDD).
Set Up Your Local Environment
Before diving into the source code, let’s set up your local environment so you can follow along.
The project has the following structure.1
2
3
4
5
6
7
8
9
10
11
12
13.
├── .gitignore
├── Pipfile
├── Pipfile.lock
├── pytest.ini
└── tests
├── __init__.py
├── conftest.py
├── pages
│ ├── login_page.py
│ └── search_page.py
├── test_basic_selenium.py
└── test_pom.py
Some knowledge of Python (used v3.12 for this example but any recent version should work) and Pytest is expected.
Note — I’m using Pipenv to manage virtual environments and packages instead of Conda but feel free to use what’s best for you.
This guide covers the background, motivation and also how to use Pipenv.1
2pipenv shell
pipenv install --dev
Once you’re all set up with dependencies let’s move on.
Testing with Selenium — Simple Example
Setup Chrome Driver
First, let’s set up our Chrome Browser Driver, defined as a fixture (function scoped as default).1
2
3
4
5
6
7
8
9
10
11
12
13
14
15
16
17
18import pytest
from selenium import webdriver
from selenium.webdriver.chrome.service import Service as ChromeService
from webdriver_manager.chrome import ChromeDriverManager
def chrome_browser():
driver = webdriver.Chrome()
# Use this line instead of the prev if you wish to download the ChromeDriver binary on the fly
# driver = webdriver.Chrome(service=ChromeService(ChromeDriverManager().install()))
driver.implicitly_wait(10)
# Yield the WebDriver instance
yield driver
# Close the WebDriver instance
driver.quit()
Check which version of Chromium you’re using and download the driver from here.
At the time of writing, I picked the latest one from this downloads page.
Version — 121.0.6167.85 (Stable)
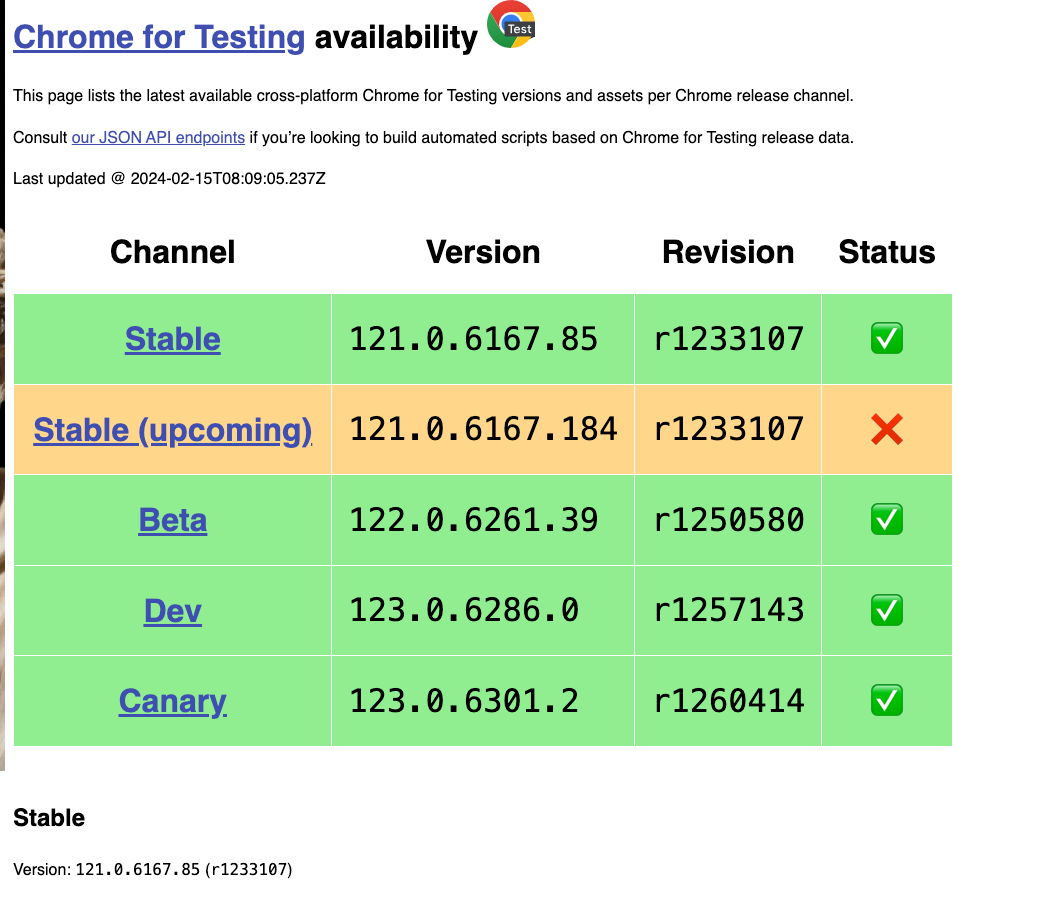
As mentioned in the code you can also install the binary on the fly if you wish to, I just find it easier to download the driver, add it to the path and be done.
The implicitly_wait method as the name suggests is a sticky wait until an action completes or an element is found.
Notice the use of yield indicating the use of Pytest fixture setup and teardown functionality.
This is the Arrange step.
Example Test 1 (Basic Web Page Title)
Now let’s write a very simple Selenium-based test.
tests/test_basic_selenium.py1
2
3
4
5
6def test_title(chrome_browser):
"""
Test the title of the Python.org website
"""
chrome_browser.get("https://www.python.org")
assert chrome_browser.title == "Welcome to Python.org"
We pass the above chrome_browser fixture parameter to our test and get the Python official webpage.
Using the fixture to get the webpage is the Act phase and lastly asserting the title is the Assert phase.
You can assert pretty much any HTML, CSS or Javascript property (it just boils down to finding the element and carrying out the interaction).
Let’s run the test

You’ll notice a Chrome browser spin up and shut down. This is part of the test and hence why it’s kinda slow, depending on network and local system speeds.
Now let’s get a bit more complex.
Example Test 2 (DuckDuckGo Search)
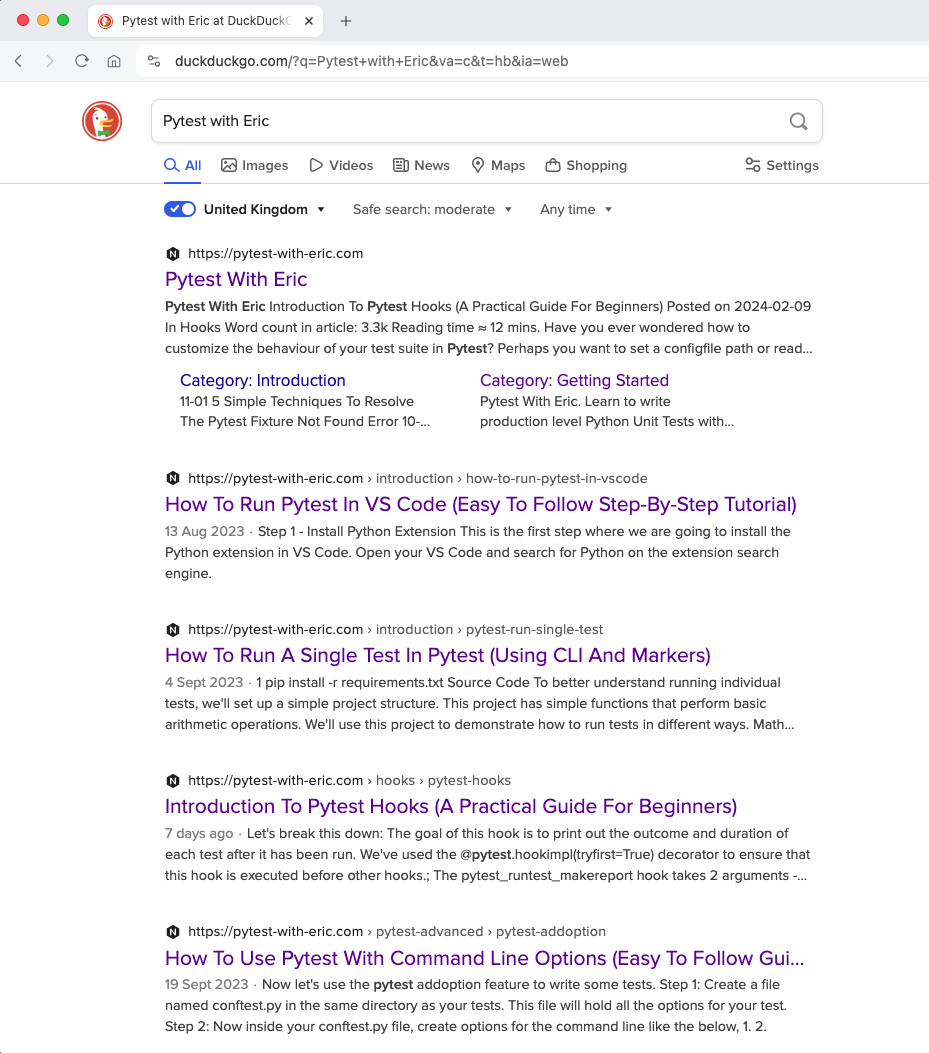
In this example, we’ll write a simple test that opens the popular DuckDuckGo search engine, locates the search box and searches for a phrase.
You’ll then assert that the search term is in the title.
Here’s what it looks like done manually.

Now let’s write out the test.
tests/test_basic_selenium.py1
2
3
4
5
6
7
8
9
10
11
12
13
14
15
16
17def test_search(chrome_browser):
"""
Test the search functionality of the DuckDuckGo website
"""
url = "https://duckduckgo.com/"
search_term = "Pytest with Eric"
# Navigate to the Google home page.
chrome_browser.get(url)
# Find the search box using its name attribute value.
search_box = chrome_browser.find_element(By.ID, value="searchbox_input")
# Enter a search query and submit.
search_box.send_keys(search_term + Keys.RETURN)
# Assert that the title contains the search term.
assert search_term in chrome_browser.title
Let’s break it down
- Pass in the
chrome_browserfixture. - Get the URL
- Find the element by ID which we can do by right-clicking inspect on the search box itself (see screenshot)
- Use the
send_keysmethod to submit the text and hit the return button - Assert the search term in the title.
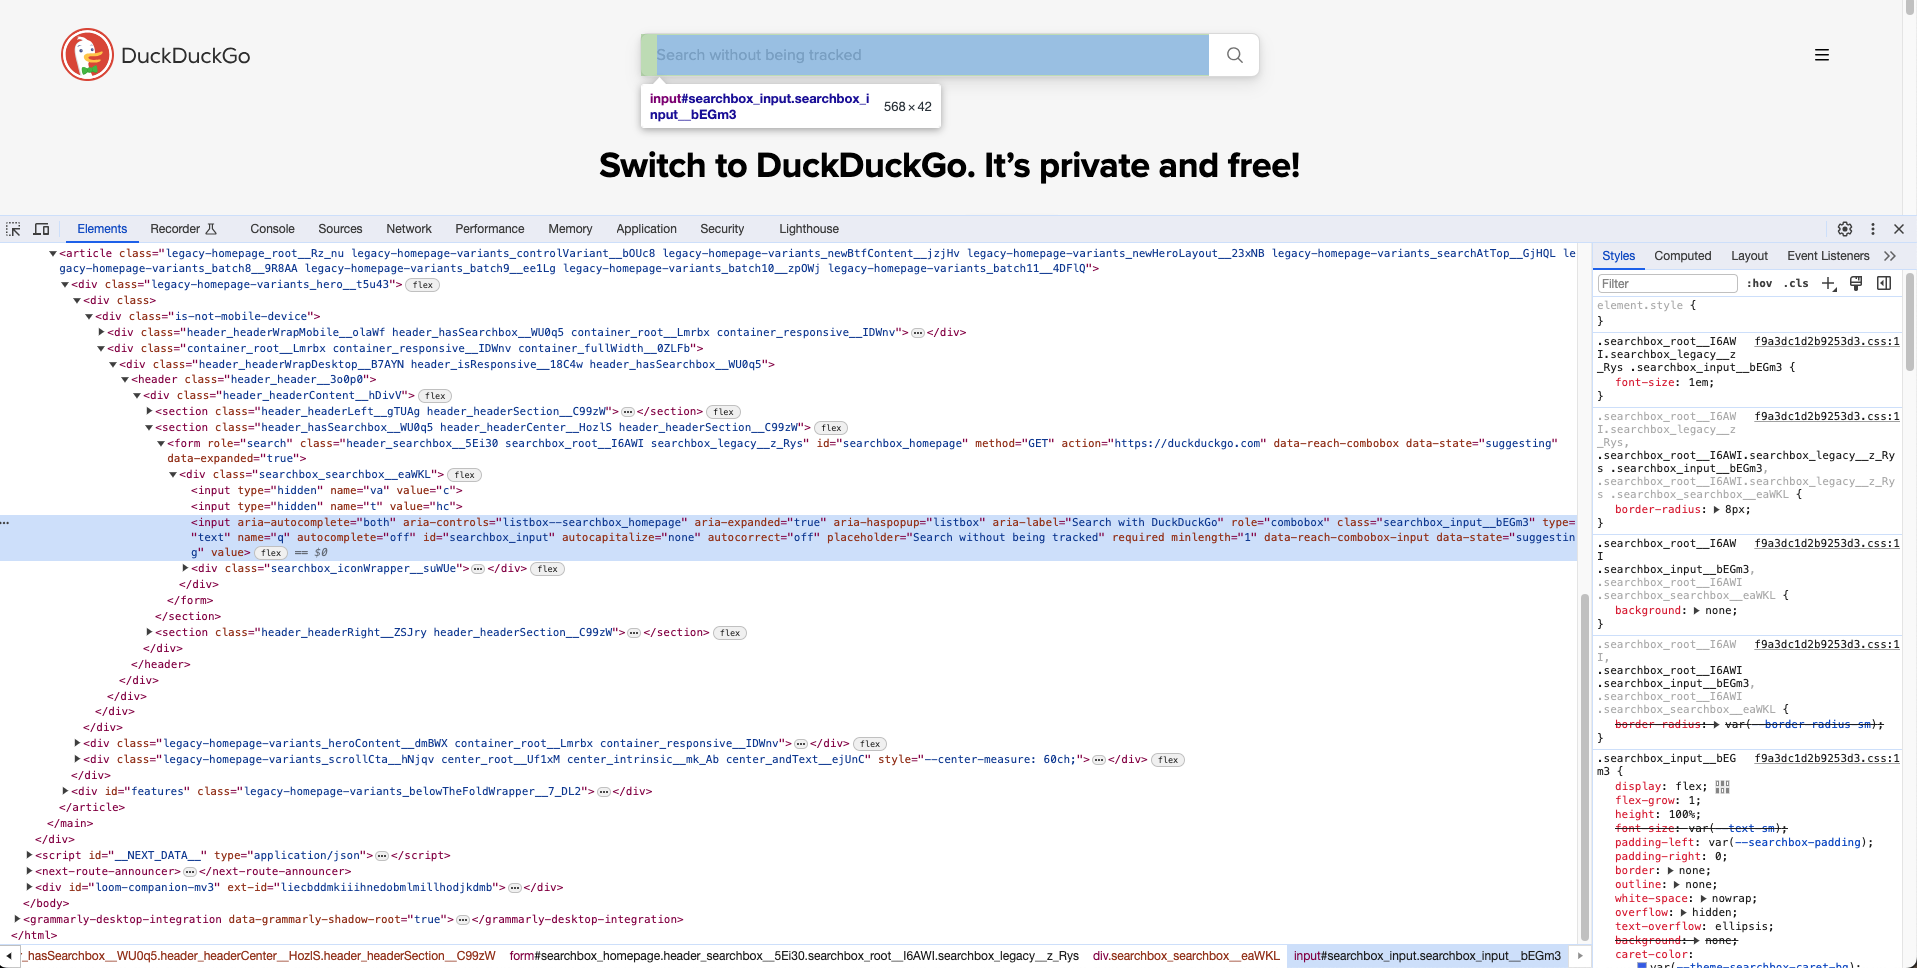
Running the test gives us

Example Test 3 (Basic Website Login)
Here’s a different bit more complex example.
I’ve used this practice website to simulate a basic website login.
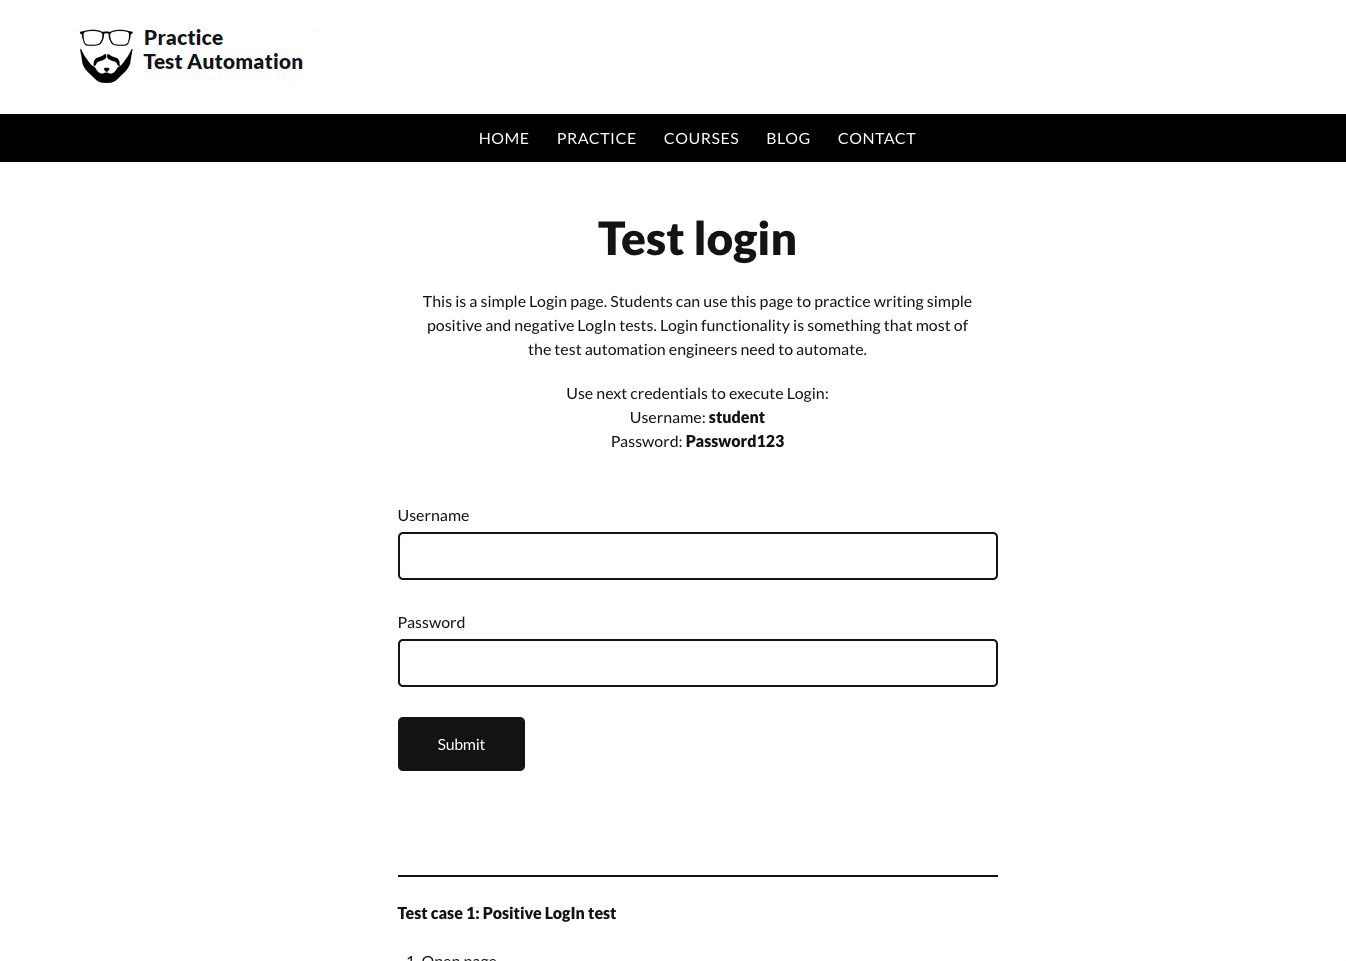
You can use any website or even spin up your own auth system, I just kept things simple without OAuth or 2FA to show how this works.
Here’s the code.
tests/test_basic_selenium.py1
2
3
4
5
6
7
8
9
10
11
12
13
14
15
16
17
18
19
20
21
22
23
24
25
26
27
28
29
30
31
32def test_login_functionality(chrome_browser):
"""
Test the login functionality of the Practice Test Automation website
"""
url = "https://practicetestautomation.com/practice-test-login/"
# Navigate to the login page
chrome_browser.get(url)
# Find and fill the username and password fields
chrome_browser.find_element(By.ID, "username").send_keys("student")
chrome_browser.find_element(By.ID, "password").send_keys("Password123")
# Find and click the login button
chrome_browser.find_element(By.ID, "submit").click()
# Verify that the login was successful by checking the presence of a logout button
# Option 1: Locate by class name (if unique and reliable)
try:
logout_button = chrome_browser.find_element(
By.CLASS_NAME, "wp-block-button__link"
)
assert logout_button.is_displayed(), "Logout button is not displayed."
except NoSuchElementException:
assert False, "Logout button does not exist."
# Option 2: Locate by link text (if the text is unique and reliable)
try:
logout_button = chrome_browser.find_element(By.LINK_TEXT, "Log out")
assert logout_button.is_displayed(), "Logout button is not displayed."
except NoSuchElementException:
assert False, "Logout button does not exist."
The first parts are pretty much identical.
- Get the URL
- Find the element ID of the username and password fields and enter the values of username and password (given on the website).
- Find the element ID of the submit button and click it.
Once logged in, we want to assert that a Logout button is displayed.
Now inspecting the page, you can see that the Logout button is indeed displayed but without an ID.
However, it does have a CSS class.
So we find the element by the class name wp-block-button__link and use the is_displayed property to assert its presence.
Another option is to use the link text (the text that displays on the button itself).
Now you can have several permutations to write “Log out” but you get my point.
Using the element ID is by far the most reliable way to access the correct element however in its absence you can resolve to other strategies.
Running this also returns the expected pass with the NoSuchElementException in case of failures.


Example Test 4 (Using the pytest-selenium plugin)
All of this has been super interesting.
Your ability to run tests against Web Browser UIs in Pytest seems great.
Is there something more native? Built just for Pytest?
Indeed there is.
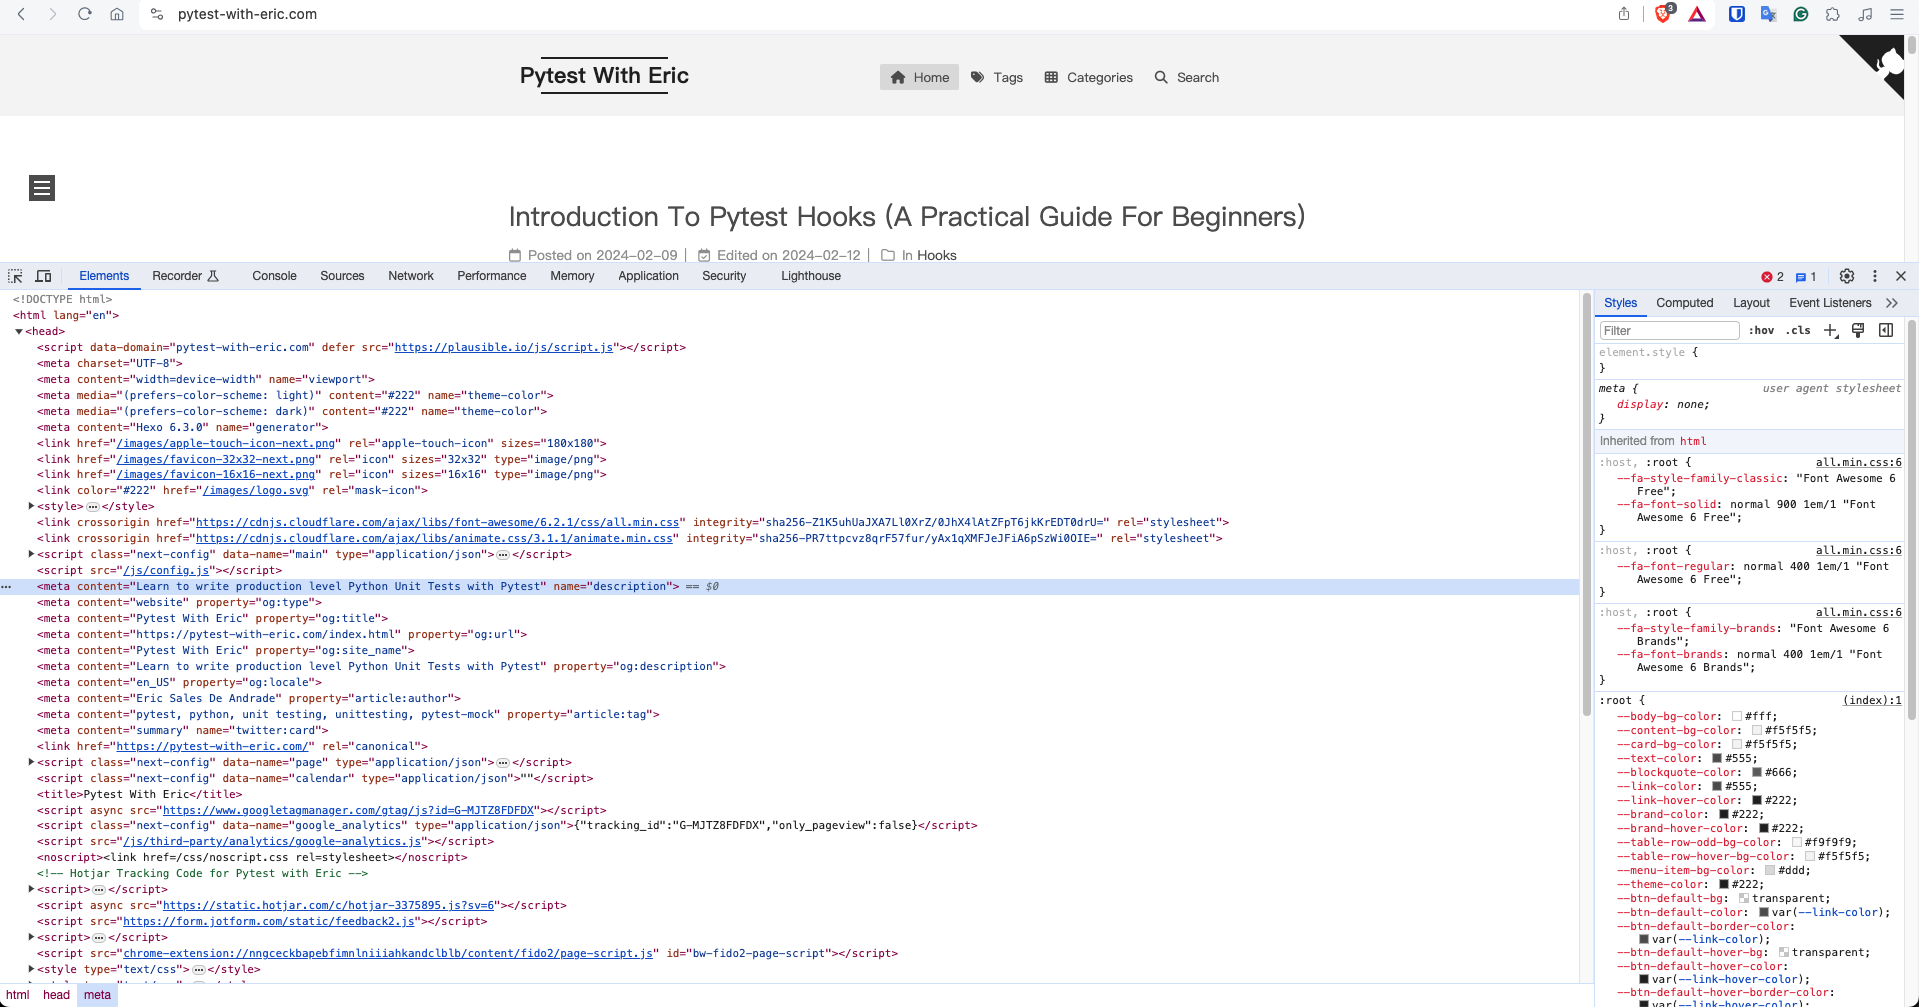
The pytest-selenium plugin gives you an out-of-the-box fixture selenium that you can directly import and use into your tests.
Without having to define your fixtures, manage and set up teardowns.
Let’s see how to use this (make sure to install the plugin before).
tests/test_basic_selenium.py1
2
3
4
5
6
7
8
9
10
11
12
13
14
15
16
17
18
19
20def test_pytest_selenium_plugin_example(selenium):
"""
Test the title and description of the Pytest with Eric website using the pytest-selenium plugin
"""
selenium.get("https://pytest-with-eric.com")
# Assert Web page title
selenium.implicitly_wait(10)
assert selenium.title == "Pytest With Eric"
# Get Description
# Locate the meta tag by its name attribute
meta_description = selenium.find_element(By.XPATH, "//meta[@name='description']")
# Retrieve the content attribute of the meta tag
content_value = meta_description.get_attribute("content")
# Assert the content attribute's value
expected_content = "Learn to write production level Python Unit Tests with Pytest"
assert content_value == expected_content
It’s pretty much similar to what you’ve learnt so far.
The only difference is the fixture selenium .
Also, note we’re using the XPATH element locator to find the content field in the meta description.
Now you still need to define the driver used and you can easily do so via the command line using1
2pytest --driver Firefox
pytest --driver Chrome
I don’t know about you but I don’t particularly like passing command-line arguments so I’ve defined these in the pytest.ini config file.
If you’re unfamiliar with config files I recommend checking out this guide on Pytest config files.
This guide goes into pytest.ini in great detail.
Here’s what mine looks like.
pytest.ini1
2[pytest]
addopts = --driver Chrome
We’ve used the addopts config setting to pass the argument.
I can now cleanly run my test.

The Page Object Model
In other articles, we discussed abstracting implementation from the tests.
In simple words, don’t test the implementation of your code rather test it like a black box.
Let’s do something similar here.
If you examine the tests, you’ll see the web page element IDs hardcoded in the tests.
This is not ideal especially if you choose to share the elements across several test modules or files.
If the element ID (username box ID, search button ID etc.) changes, you’ll need to change it in n different places.
We can solve this problem with a very simple design principle called “The Page Object Model” (POM).
This is a very simple concept — separate the page and all its elements and actions into its class.
Then import and use that class in the tests.
Let’s see what this looks like
tests/pages/login_page.py1
2
3
4
5
6
7
8
9
10
11
12
13
14
15
16
17
18
19
20
21
22
23
24
25
26
27
28
29
30
31
32
33
34"""
Login Page Class for https://practicetestautomation.com/practice-test-login/
"""
from selenium.webdriver.common.by import By
from selenium.common.exceptions import NoSuchElementException
class LoginPage:
def __init__(self, driver):
self.driver = driver
def open_page(self, url):
self.driver.get(url)
def enter_username(self, username):
self.driver.find_element(By.ID, "username").send_keys(
username
) # Username element ID
def enter_password(self, password):
self.driver.find_element(By.ID, "password").send_keys(
password
) # Password element ID
def click_login(self):
self.driver.find_element(By.ID, "submit").click() # Submit button ID
def verify_successful_login(self):
try:
logout_button = self.driver.find_element(By.LINK_TEXT, "Log out")
return logout_button.is_displayed()
except NoSuchElementException:
assert False, "Logout button does not exist."
Here we have different methods for
- open page
- enter username
- enter password
- click login
- verify successful login
The page element IDs are defined in one place and can be cleanly shared across many tests and modules.
Now we can rewrite the test as follows.
tests/test_pom.py1
2
3
4
5
6
7
8
9
10
11
12
13
14
15
16
17
18
19
20
21
22
23import pytest
from tests.pages.login_page import LoginPage
def test_login_functionality(chrome_browser):
"""
Test the login functionality of the Practice Test Automation website
"""
url = "https://practicetestautomation.com/practice-test-login/"
login_page = LoginPage(chrome_browser)
# Open Page
login_page.open_page(url)
# Enter Username and Password
login_page.enter_username("student")
login_page.enter_password("Password123")
# Click Login
login_page.click_login()
# Verify Successful Login by checking the presence of a logout button
assert login_page.verify_successful_login()
You can immediately see how clean and portable the test looks.
We can do the same for our DuckDuckGo Search Class.
tests/pages/search_page.py1
2
3
4
5
6
7
8
9
10
11
12
13
14
15
16
17"""
SearchPage class to interact with the search page on DuckDuckGo
"""
from selenium.webdriver.common.keys import Keys
from selenium.webdriver.common.by import By
class SearchPage:
def __init__(self, driver):
self.driver = driver
def open_page(self, url):
self.driver.get(url)
def search(self, search_term):
search_box = self.driver.find_element(By.ID, value="searchbox_input")
search_box.send_keys(search_term + Keys.RETURN)
Correspondingly the testtests/test_pom.py1
2
3
4
5
6
7
8
9
10
11
12
13
14
15
16
17
18
19
20import pytest
from tests.pages.search_page import SearchPage
def test_search_functionality(chrome_browser):
"""
Test the search functionality of the DuckDuckGo website
"""
url = "https://duckduckgo.com/"
search_term = "Pytest with Eric"
search_page = SearchPage(chrome_browser)
# Open Page
search_page.open_page(url)
# Search for the term
search_page.search(search_term)
# Assert that the title contains the search term.
assert search_term in chrome_browser.title
Running the tests

Note — I’ve used markers such as search and login to classify tests, making them easy to select and run.
To learn more about Pytest markers check out this detailed guide which explains various ways to help you classify and run your tests such as unit , integration , e2e , regression and so on.
Best Practices and Tips
Having learnt so much about using Pytest with Selenium including several practice examples and the page object model, it’s time to explore some best practices.
What are the “thou should-dos”?
- Use Pytest Fixtures for Efficient Test Setup and Teardown — Use fixtures to initialize the Selenium WebDriver, manage test data, and close browser sessions in line with desired fixture scopes.
- Adopt the Page Object Model (POM) — The Page Object Model is an essential design pattern in Selenium tests. It involves creating a separate class for each web page, encapsulating all the interactions with that page. This abstraction makes your tests more readable, maintainable, and reusable.
- Implement a Robust Selector Strategy — Avoid using brittle selectors that can easily break with UI changes. Prioritize unique ID, name, or class selectors.
- Parallelize Tests to Speed Up Execution — Plugins like
pytest-xdistsignificantly reduce the time required to run your entire test suite by running tests in parallel. - Integrate with CI Systems — Automate the execution of your Pytest Selenium tests within your CI/CD pipeline to catch issues early (ideally before releasing to production).
- Organize Tests with Marks and Parameterization — Pytest marks allow you to categorize tests, making it easy to run subsets of the test suite. Parameterization, on the other hand, lets you run the same test with different inputs, maximizing test coverage with minimal code for example (testing across many browsers and more test cases).
Example1
2
3
4
5
6
7
8
9import pytest
def test_login_success(browser):
# Test code for successful login
def test_multiple_logins(browser, username, password):
# Test code for multiple logins
- Use Explicit Waits (where possible) — Rely on explicit waits rather than implicit waits or
time.sleep(). Explicit waits are a more reliable way to wait for elements to become available or conditions to be met, reducing flakiness in your tests.
Example from the Selenium Docs1
2
3
4
5
6
7
8
9
10
11
12
13from selenium import webdriver
from selenium.webdriver.common.by import By
from selenium.webdriver.support.wait import WebDriverWait
from selenium.webdriver.support import expected_conditions as EC
driver = webdriver.Firefox()
driver.get("http://somedomain/url_that_delays_loading")
try:
element = WebDriverWait(driver, 10).until(
EC.presence_of_element_located((By.ID, "myDynamicElement"))
)
finally:
driver.quit()
Debugging and Troubleshooting
Having reviewed some of the best practices when working with Pytest and Selenium, what if you find yourself facing common issues?
Element Not Found Errors
One of the most frequent issues faced during Selenium testing is the “Element Not Found” error.
This occurs when Selenium attempts to interact with a web element that is not available in the Document Object Model (DOM) at the time of execution.
How To Debug?
- Check the Locator Accuracy: Ensure the locator (ID, XPath, CSS Selector, etc.) used to find the element is correct.
- Use Explicit Waits: Instead of relying on static sleep, use explicit waits to wait for an element to become present or clickable.
Timing Issues
Timing issues occur when a test tries to interact with a web page that hasn’t finished loading or when asynchronous operations are still in progress.
How To Debug?
- Implement Smart Waits: Leverage Selenium’s explicit and implicit wait mechanisms to handle dynamic content. Explicit waits are particularly useful for waiting for specific conditions (like element visibility) before proceeding.
- Adjust Implicit Waits: While explicit waits are preferred, adjusting the implicit wait time can provide a safety net for the entire test execution.
Driver Issues
Your Chrome or Firefox driver may fail to connect or act flaky.
How To Debug?
- Ensure you’ve downloaded the correct driver for the correct platform.
- If you’re running tests on a CI/CD platform, make sure to download the correct browser driver for that test runner image.
- Double-check your configuration and read the docs for any explicit configuration options.
- Check that your driver is added to the path and is running.
Conclusion
This article has been somewhat different.
In the sense that it’s my first one on this website discussing Web UI and testing front-end elements.
However, given the widespread popularity of Selenium and repeated requests from readers, I decided why not.
Here we covered some basics of Selenium and talked about the need for Web Browser UI testing.
We then looked at several examples to understand the concept like testing a webpage login, title checks, and search checks and even studied the important concept of the Page Object Model (POM).
Lastly, we learnt about the best practices when working with Pytest and Selenium and strategies to debug failing tests.
With all this experience go out and explore the world of testing web pages, the internet is your oyster.
If you have ideas for improvement or like me to cover anything specific, please send me a message via Twitter, GitHub or Email.
Till the next time… Cheers!
Additional Reading
Link to Example Code: Pytest Selenium Example
Maximizing Quality - A Comprehensive Look at Testing in Software Development
What is Setup and Teardown in Pytest? (Importance of a Clean Test Environment)
Pytest Config Files - A Practical Guide To Good Config Management
What Is pytest.ini And How To Save Time Using Pytest Config
Ultimate Guide To Pytest Markers And Good Test Management
What Are Pytest Fixture Scopes? (How To Choose The Best Scope For Your Test)
Save Money On You CI/CD Pipelines Using Pytest Parallel (with Example)
Web UI Testing Made Easy with Python, Pytest and Selenium WebDriver
6 | Page Object Model | Selenium Python
pytest-selenium Plugin Documentation
Selenium Pytest Tutorial: A Comprehensive Guide, with Examples & Best Practices