The Ultimate Guide To Capturing Stdout/Stderr Output In Pytest
With Pytest, one of the tricker aspects can be understanding and controlling the standard output (stdout) and standard error (stderr).
Often, during testing, your code generates output or errors that are directed to the console.
This can lead to cluttered and obscure test outputs, making it challenging to decipher test results and debug effectively.
So how do you control what’s shown on the console and make your tests easier to debug?
This article addresses this exact problem, offering you valuable insights into managing Pytest stdout and stderr.
Why is this important?
Mastering control of stdout and stderr clears up your test outputs and simplifies debugging.
In this article, you’ll learn practical solutions to this common issue using real examples, demonstrating how to effectively capture and assert output in tests.
Next, you’ll learn about the inbuilt Pytest fixtures to support capturing outputs - capsys, capfd and so on.
Additionally, you’ll discover how these techniques seamlessly integrate with other powerful Pytest features, such as fixtures and parameterization.
By the end, you’ll be equipped with the tools and knowledge to streamline your testing process.
So are you ready? Let’s get started.
How Do I Print Output To The Console In Pytest?
For you TLDR; seekers out there.
You use print standard Python output in Pytest using the print function.
However, by default, Pytest captures all output sent to stdout and stderr, so you won’t see the printed output in the console when running tests unless a test fails.
To see the print statements in the console while running your tests, you can use the -s or --capture=no option:
Running Pytest with the -s option tells Pytest not to capture any output.
For example:1
pytest your_test_file.py -s
You can also use the -v , -vv or -vvv verbosity flag to show detailed console outputs and debug failing tests.
What is stdout/stderr?
In programming, stdout (standard output) is the primary channel through which a program outputs data.
On the other hand, stderr is used specifically for outputting error messages and diagnostics, separate from the main output stream.
In unit testing, stdout and stderr are windows through which you can observe the internal workings of your code during tests.
By capturing and analyzing the outputs and error messages, you gain valuable insights into the behaviour of your code and tests under various conditions.
This can pinpoint the exact nature and location of issues.
Now that we’re clear on what stdout and stderr are — let’s look at them from the Pytest lens, based on the documentation.
Default Pytest stdout/stderr Capturing Behaviour
In Pytest, any text that would normally be printed on the screen (through stdout and stderr) are not shown immediately.
Instead, they are stored (‘captured’) by Pytest.
If a test or its setup method fails, Pytest will then display these stored messages along with the detailed report of the failure (although you can change this behaviour using a command-line option called --show-capture).
Pytest Capturing Methods
Now, it’s possible to modify the stdout and stderrcapture behavior in Pytest.
Let’s look at the supported settings using a simple example.1
2
3
4
5
6
7
8
9
10
11
12
13
14
15
16
17
18
19
20
21import sys
import os
import pytest
def test_pass():
print("Passing test: Message to stdout")
print("Passing test: Message to stderr", file=sys.stderr)
os.system(
"echo 'Passing test: Message to stdout - Running as subprocess'"
) # stdin = 0, stdout = 1, stderr = 2
os.system("echo 'Passing test: Message to stderr - Running as subprocess' >&2")
assert True
def test_fail():
print("Failing test: Message to stdout")
print("Failing test: Message to stderr", file=sys.stderr)
os.system(
"echo 'Failing test: Message to stdout - Running as subprocess'"
) # stdin = 0, stdout = 1, stderr = 2
os.system("echo 'Failing test: Message to stderr - Running as subprocess' >&2")
assert False
Here we have 2 tests — test_pass and test_fail .
- Print
passing_testorfailing_testmessage tostdoutandstderr. - Print
passing_testorfailing_testandos.systemsubprocess messages tostdoutandstderr.
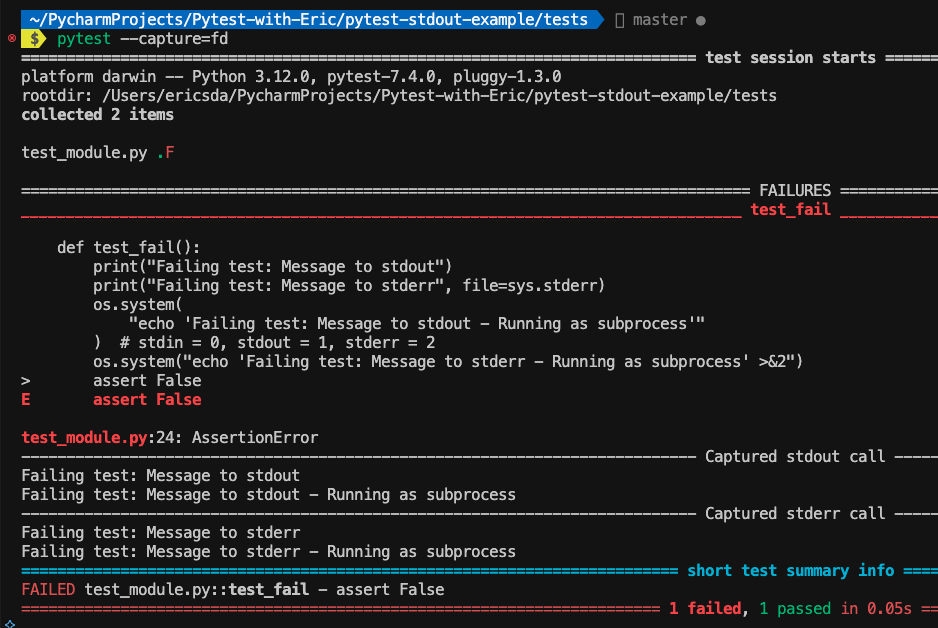
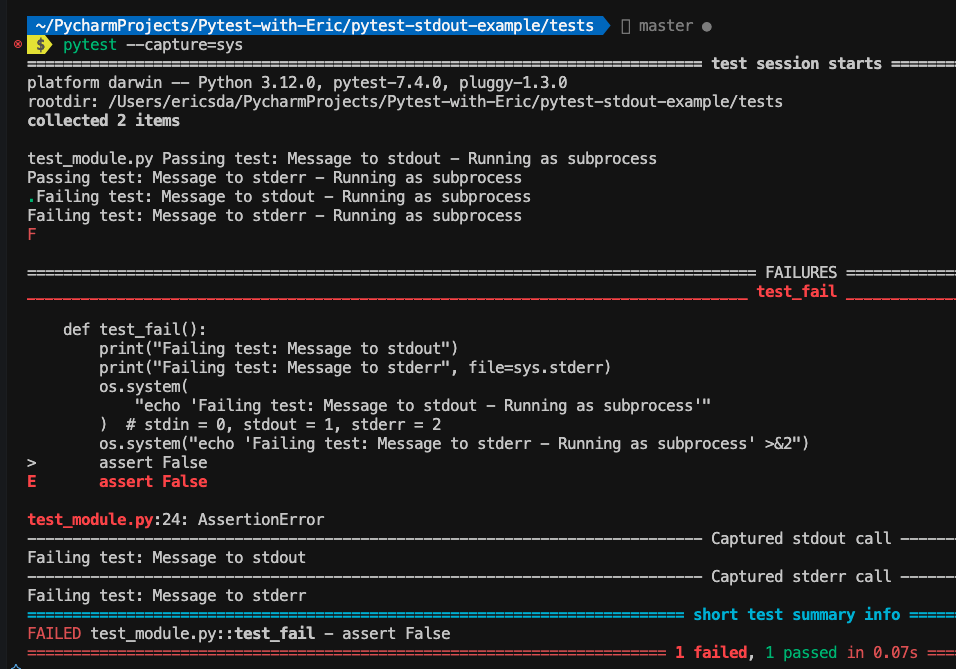
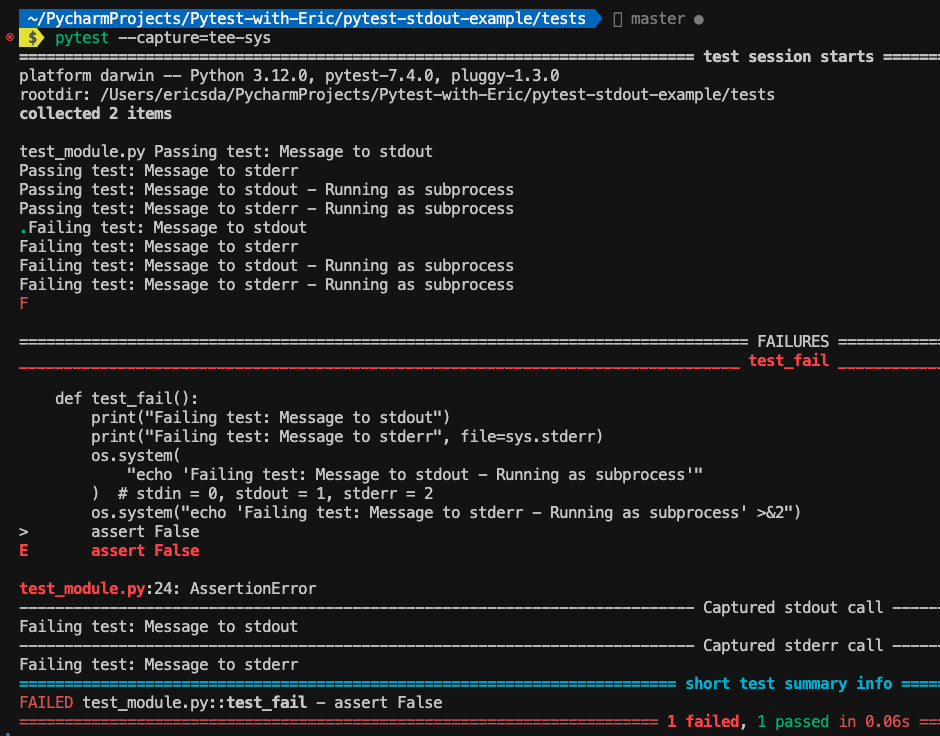
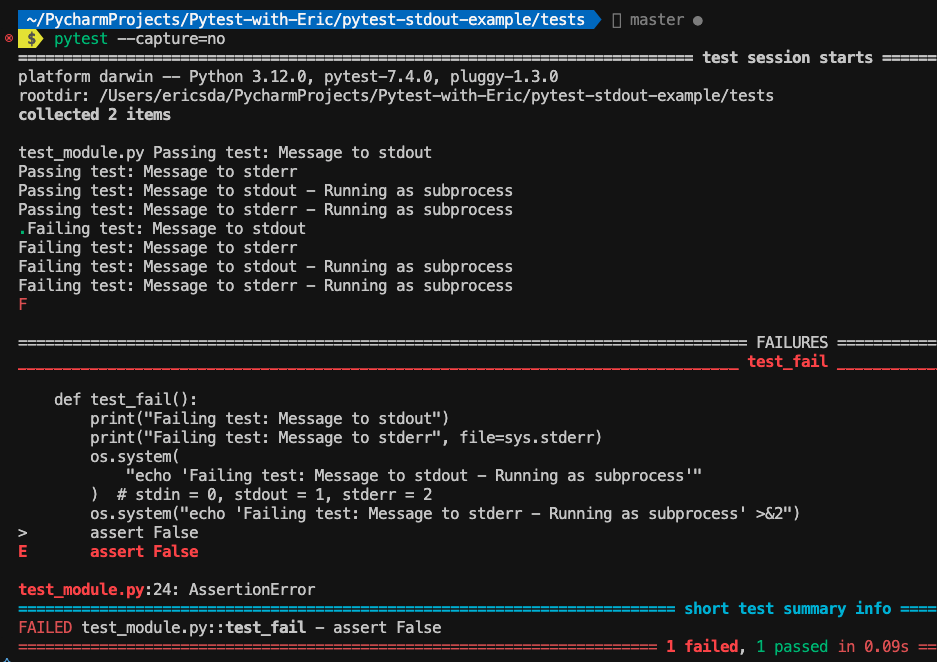
Pay close attention to the stdout and stderr sections in the screenshots.
fd (file descriptor) level capturing (default):
1 | pytest --capture=fd |

- All output and errors (even from subprocesses) are captured.
sys level capturing
1 | pytest --capture=sys |

- Only writes to Python files
sys.stdoutandsys.stderrare captured. - No capturing of writes to file descriptors and low-level processes.
tee-sys capturing
1 | pytest --capture=tee-sys |

- A combination of real-time display and capturing.
- Works like
sysmode but also shows output on the console as the test runs. - Provides a balance of immediate feedback and detailed failure reports.
- No capturing of writes to file descriptors and low-level processes.
Disable output capturing
1 | pytest -s |

- The
-soption is used to disable all output capturing. - Can also be called with the flag
--capture=no.
How To Access Captured Output From Tests
Having gained a strong understanding of how Pytest stdout and stderr works and the various modes of operations, let’s now look at how to access the captured outputs.
Pytest Capsys Fixture
In Pytest, the capsys fixture is a built-in tool that allows you to capture and test output in your unit tests.
It intercepts and collects anything printed to stdout and stderr, making it invaluable for testing console outputs or logging messages.
Here’s a concise example:1
2
3
4def test_capsys(capsys):
print("Hello, Pytest!")
captured = capsys.readouterr()
assert captured.out == "Hello, Pytest!\n"

In this test, capsys captures the output of print, and we assert that the captured output matches our expectations.
This fixture is perfect for ensuring your code’s output is as intended, enhancing your unit testing robustness.
Pytest Capfd and Capfdbinary Fixtures
In Pytest, alongside capsys, there are fixtures like capfd and capfdbinary which serve similar but slightly different purposes:
Capfd Fixture
This captures file descriptors (FD) output, specifically for stdout and stderr.
Unlike capsys which only intercepts output from Python functions like print, capfd captures output from lower-level file descriptors, which can include output from external C code or subprocesses.
Let’s see an example to illustrate this.1
2
3
4
5
6
7
8
9
10
11
12
13def test_capfd(capfd):
# Capture output to `stdout` using basic and subprocess
print("Hello, Pytest!")
captured = capfd.readouterr()
assert captured.out == "Hello, Pytest!\n"
os.system("echo 'Passing test: Message to stdout - Running as subprocess'")
captured = capfd.readouterr()
assert captured.out == "Passing test: Message to stdout - Running as subprocess\n"
# Capture output to `stderr` using basic and subprocess
print("Oh we have an Error!", file=sys.stderr)
captured = capfd.readouterr()
assert captured.err == "Oh we have an Error!\n"

In the first case, we captured and accessed the basic (print statement) and subprocess (os.system command) outputs into stdout .
In the second, we captured and assessed the stderr output.
Capfdbinary Fixture
It is similar to capfd, but instead of capturing text output, it captures binary data.
This is useful when you’re dealing with binary output, like from a subprocess that outputs a binary stream.
For example,1
2
3
4
5def test_capfdbinary(capfdbinary):
# Directly write bytes to stdout
os.write(1, b"Hello, Pytest!\n")
captured = capfdbinary.readouterr()
assert captured.out == b"Hello, Pytest!\n"

Advanced Concepts
Integrating stdout with Pytest Parametrization
Combining stdout capturing with Pytest’s features like parameterization or fixtures elevates testing efficiency.
For instance, with parameterized tests, you can validate Pytest stdout for various inputs in one swoop.
Here’s a snippet:1
2
3
4
5
def test_capsys_parametrization(capsys, input, expected):
print(f"Result: {input}")
captured = capsys.readouterr()
assert captured.out.strip() == expected

This approach tests different inputs and their corresponding stdout in a single function, making tests more compact and readable.
Performance Considerations
When capturing stdout be mindful of performance.
Excessive use of stdout capturing can slightly slow down tests due to the extra overhead in capturing and storing the outputs.
It’s often negligible, but in tests where performance is critical, consider minimizing stdout captures or use them selectively.
Conclusion
In this article, you explored Pytest stdout and stderr and the various modes of operation.
From understanding the default capturing behaviour to advanced features like capsys, capfd, and capfdbinary, you covered the essential ground to make your debugging and testing process easier.
You also learned about Pytest’s different modes of controlling and capturing outputs and errors.
Lastly, you saw how inbuilt fixtures like capsys can be used with other Pytest functionalities like Parametrization.
I highly encourage you to practice and experiment with the power of Pytest stdout and stderr capturing.
As you continue to explore, you’ll find your confidence and testing skills growing exponentially.
If you have ideas for improvement or like for me to cover anything specific, please send me a message via Twitter, GitHub or Email.
Till the next time… Cheers!
Additional Reading
How to Effortlessly Generate Unit Test Cases with Pytest Parameterized Tests
How Pytest Fixtures Can Help You Write More Readable And Efficient Tests
How To Debug Failing Tests Like A Pro (Use Pytest Verbosity Options)
pytest: How to Capture STDOUT and STDERR