How To Set Up Pytest With PyCharm (Step-By-Step Guide)
Have you ever wanted to run a single unit test only to find yourself running the entire test suite every time, wasting valuable time and resources?
Running a single test is entirely possible with Pytest, but it’s not as straightforward or user-friendly.
What if you want to define configuration for your tests, such as environment variables, custom arguments, verbosity and run them with a single click repeatedly?
How about if you wanted to add a debugger or line breakpoints to your tests?
You’d kinda struggle to do all of this in the terminal without some advanced command-line flags, what if there was an easier way?
PyCharm is a powerful Python IDE (Integrated Development Environment) that offers advanced features for testing and debugging, streamlining the CI/CD (Continous Integration/Deployment) process.
Integrating Pytest with PyCharm significantly enhances your overall testing experience.
PyCharm’s intuitive interface allows you to run individual tests, debug code, and generate coverage reports with a single mouse click, saving you valuable time and effort.
In this article, I’ll walk you through setting up and configuring Pytest in the PyCharm IDE.
We’ll go through a step-by-step guide with an example, to help you get started with Pytest in PyCharm today and facilitate a smoother testing experience.
Let’s get started.
What You’ll Learn
By the end of this article you should be able to:
- Set up and configure Pytest in PyCharm
- Execute tests using Pytest in PyCharm
- Debug tests effectively using the Pytest-PyCharm integration
- Resolve common errors that may occur while working with Pytest in PyCharm
Overview of Pytest
If you’re new to this website, you may wonder - Why Pytest? Why not Unittest or Nose?
We’ve compared these in great detail in our article on the Practical Overview Of The Top 5 Python Testing Frameworks.
Pytest is the most widely used testing framework, known for its simplicity, flexibility, and powerful capabilities.
Pytest lets you write clean and understandable code with a simple syntax, less boilerplate, and more expressive test cases. It offers excellent community support, plugins, and documentation.
Pytest contains advanced features like fixtures, markers, parametrization, hooks and plugins, making it the ideal testing framework for Python developers.
The next section briefly discusses PyCharm’s features, explaining why you should pair Pytest and PyCharm for a more efficient testing experience.
Why Pytest in PyCharm
PyCharm is a popular and powerful Python IDE, offering several features to help you and your team work more efficiently.
Pairing Pytest with PyCharm enhances your testing experience, allowing you to run tests, debug code, and generate coverage reports with a single mouse click.
Through the Pytest-PyCharm integration, you can:
- Run Tests: Execute tests with a single click, saving time and effort.
- Debug Tests: Debug tests effectively using the Pytest-PyCharm integration.
- Configure Pytest: Define configurations for your tests, such as environment variables, custom arguments, verbosity or other supported config.
- Generate Coverage Reports: Generate coverage reports to measure the percentage of code that has been validated using a Unit Testing Framework.
- Manage Dependencies: Manage dependencies and virtual environments with ease.
We’ve written a similar guide on how to do the same with VSCode. Check it out here.
Practical Example
Let’s look at a very simple example to demonstrate how to integrate Pytest with PyCharm.
A simple Python program to check if a given year is a leap year or not.
Prerequisites
To follow this guide, you should have:
- PyCharm (Community/Professional) - This article uses
PyCharm Community Edition 2023.3.3. - Python 3.12 or a recent version is installed.
Getting Started
Our example code repo looks like this,1
2
3
4
5
6
7
8├── .gitignore
├── README.md
├── pytest.ini
├── requirements.txt
├───src
│ └── leap_year.py
└───tests
└── test_leap_year.py
To get started. clone the Github Repo here to your local machine using the terminal, GitHub Desktop, or any other Git client.
Note - In this article, we’ll use PyCharm to create and manage our virtual environment. However, you can create your own virtual environment and have PyCharm detect it.
Writing the Code
Our example code is a simple leap year finder.
src/leap_year.py1
2
3
4
5
6
7
8
9
10
11
12
13
14
15
16
17
18
19
20
21
22
23
24
25
26
27
28
29
30
31def check_leap_year(year:int) -> str:
"""
Function to check if the given year is a leap year.
Args:
year: integer
Returns:
String "Leap Year" or "Not Leap Year"
"""
## Divided by 100 means century year.
## And century year divided by 400 means
if (year % 400 == 0) and (year % 100 == 0):
return "Leap Year"
## Not divided by 100 means not a century year.
## Year divided by 4 is a leap year.
elif (year % 4 == 0) and (year % 100 != 0):
return "Leap Year"
## Not divided by 4 and 400 means not a leap year.
else:
return "Not Leap Year"
def main(year:int) -> None:
print(check_leap_year(year))
if __name__ == '__main__':
main(2000)
Here, the check_leap_year() function identifies a leap year.
Test Code
Let’s develop some tests for the example code.
tests/test_leap_year.py1
2
3
4
5
6
7
8
9
10
11
12
13
14
15from src.leap_year import check_leap_year
# Testing with leap year
def test_leap_year():
assert check_leap_year(2000) == "Leap Year"
# Testing with not leap year
def test_not_leap_year():
assert check_leap_year(2001) == "Not Leap Year"
# Testing failed result
def test_not_leap_year_2():
assert False
In the test, the functions test_leap_year() and test_not_leap_year() run against the function check_leap_year().
We intentionally included a failing test to demonstrate how PyCharm can help you debug failing tests.
How To Configure PyCharm To Run Pytest
Install PyCharm
PyCharm is available in two editions: Professional and Community.
The community edition offers essential features such as code navigation, version control, and intelligent code completion.
On the other hand, the Professional Edition provides advanced functionalities like advanced debugging tools, database tools, and support for various web development tools.
Visit Jetbrain’s official website to download PyCharm. Select .exe or .dmg, depending on your operating system.

JetBrains makes you install the Professional Edition by default. However, you can download the free community version from the bottom on the page.

During installation, you can choose to import existing settings if you have them or start from scratch.

Open an Existing Project or Create a Project
Open an Existing Project
We’re going to open the existing project we cloned earlier.
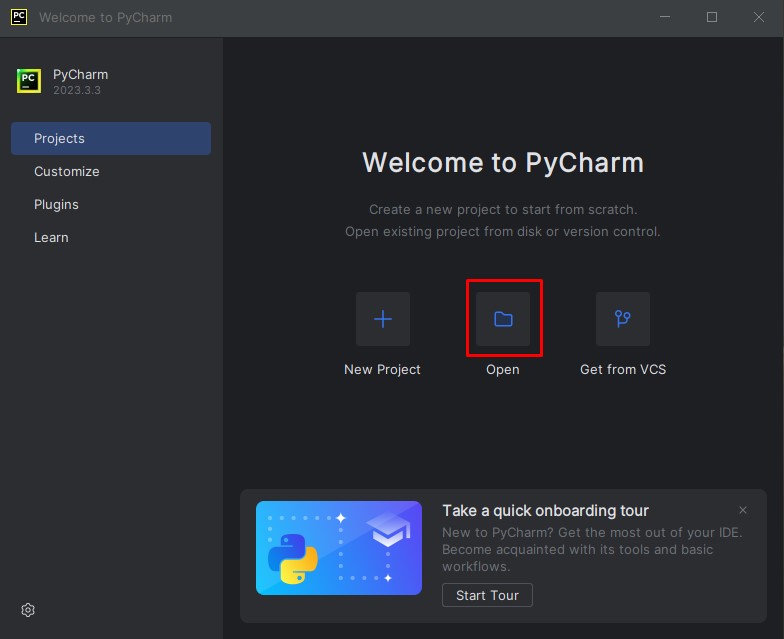
Clone the repo if not already. Now, click “Open“ from the opening window and locate the project.
Then click “Trust Project“ in the confirmation window.
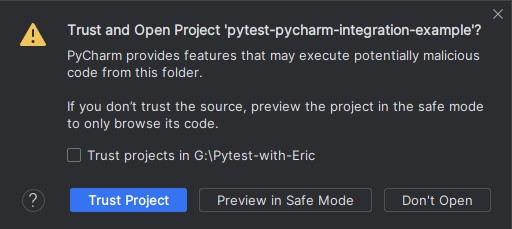
PyCharm will prompt you to create a venv automatically. We have an entire section on creating a venv below.

Moreover, you can go to File > Settings > Project:YOUR_PROJECT > Interpreter to create a custom venv.
Then, click on Add Interpreter > Add Local Interpreter and provide details like Base Interpreter, Location, etc.
Create a Project (Optional)
You can open a Git repository as an existing project in PyCharm. However, To create your own project, follow this step.
To create a project in PyCharm, click New Project, fill in details like project name, location, etc. and click Create.

Create a Virtual Environment
PyCharm allows you to create a project-specific, isolated virtual environment. The following steps will walk you through creating a virtual environment.
Click the Gear icon at the top right corner, then click on settings,

Inside Project: Project_Name > Python Interpreter (Already open by default). You can see a list of installed packages for your current virtual environment.

Click “Add Interpreter“, then “Add Local Interpreter“,

Inside the Virtualenv environment, there are a few options:
You can choose a package manager of your choice (e.g., virtualenv, conda, pipenv, poetry.) to install packages.

Environment: Select the new to create a new virtual environment. Or, you can import and existing virtual environment by clicking “Existing” and browse the location of venv.

Location: If creating a new venv, define the location of the virtual environment.
Base interpreter: If creating a new venv, select the base interpreter.
Mark the Inherit global site-packages checkbox if you want all packages installed in the global Python on your machine to be added to the virtual environment you’re going to create.

Lastly, click on OK.
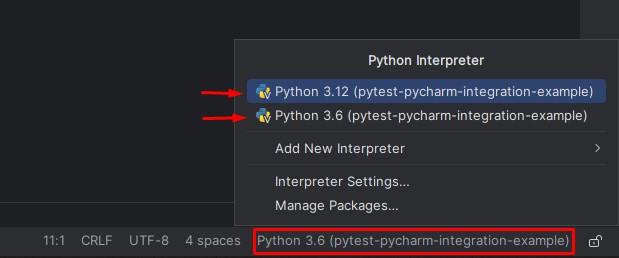
You can switch to virtual environments by clicking the bottom-right corner, mentioning your project name.
Now select a virtual environment.
Writing Tests
Pytest will automatically detect tests in the tests/ directory.
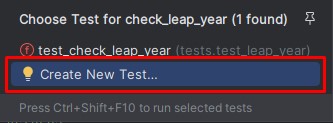
You can also add tests for a function by right-clicking on its name and selecting Go To > Test.
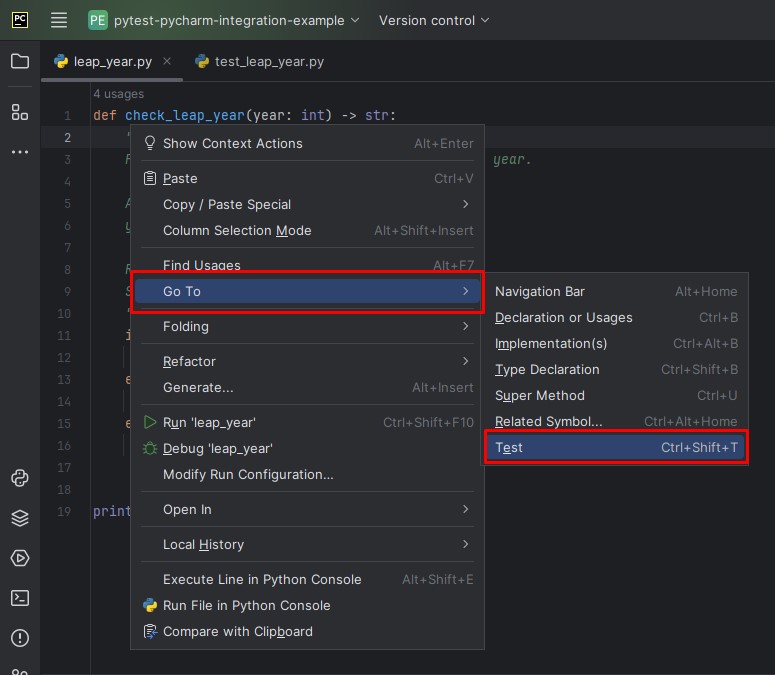
Now click Create New Test...
Configuring PyCharm for Pytest (Optional)
Set Pytest as Default Test Runner
To set Pytest as the default test runner, click on the Gear icon at the top right corner or go to File > Settings and navigate Tools > Python Integrated Tools,
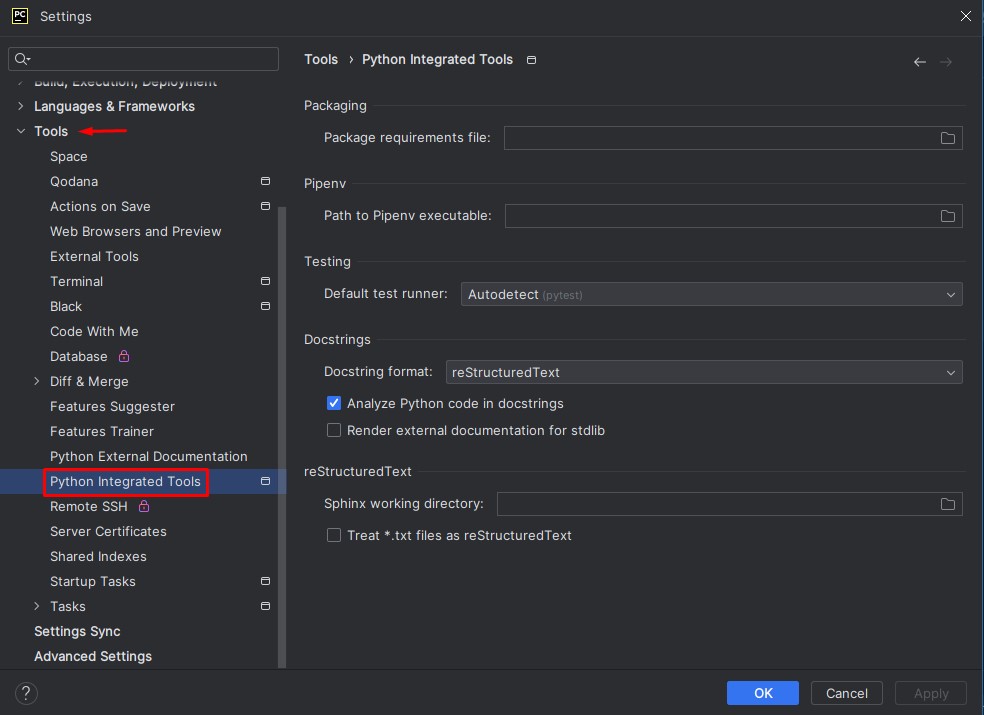
In the Testing option, set the default test runner to Pytest.

Finally, click Apply then OK.
Providing Configuration for Pytest
You can apply more test configurations by going Run > Edit Configuration.
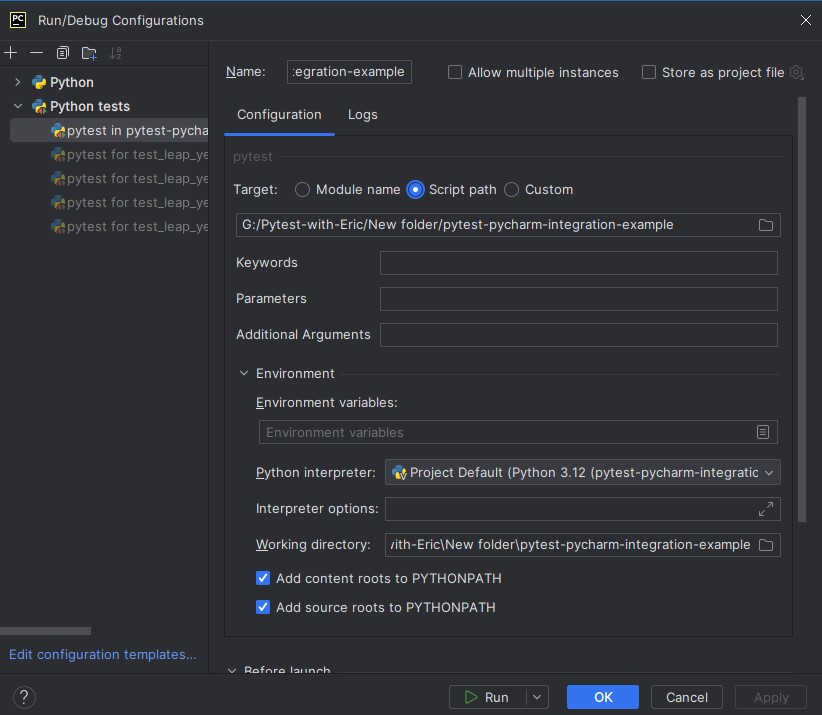
Let’s describe the options:
Target: Module name/Script path/Custom: Radio buttons to choose the possible target: Module name, Script path, and custom.
Keywords: Expression to match test names (e.g.,
-k httpto match file names containing the substringhttpliketest_http). Check out this official doc for more details.Parameters: Specify data sample for parametrized test. For example, set 2-2 in this field for the sample test:
1 | import pytest |
- Additional Arguments: Provide additional arguments (e.g., -verbose, -v or other custom arguments).
- Environment variable: Specify the desired set of environment variables in the Environment Variables dialog (e.g.,
API_ENDPOINT=www.test_api_endpoint.com). To set an environment variable, click the explore button, then click the plus icon to create an environment variable, and enter the desired name and value.
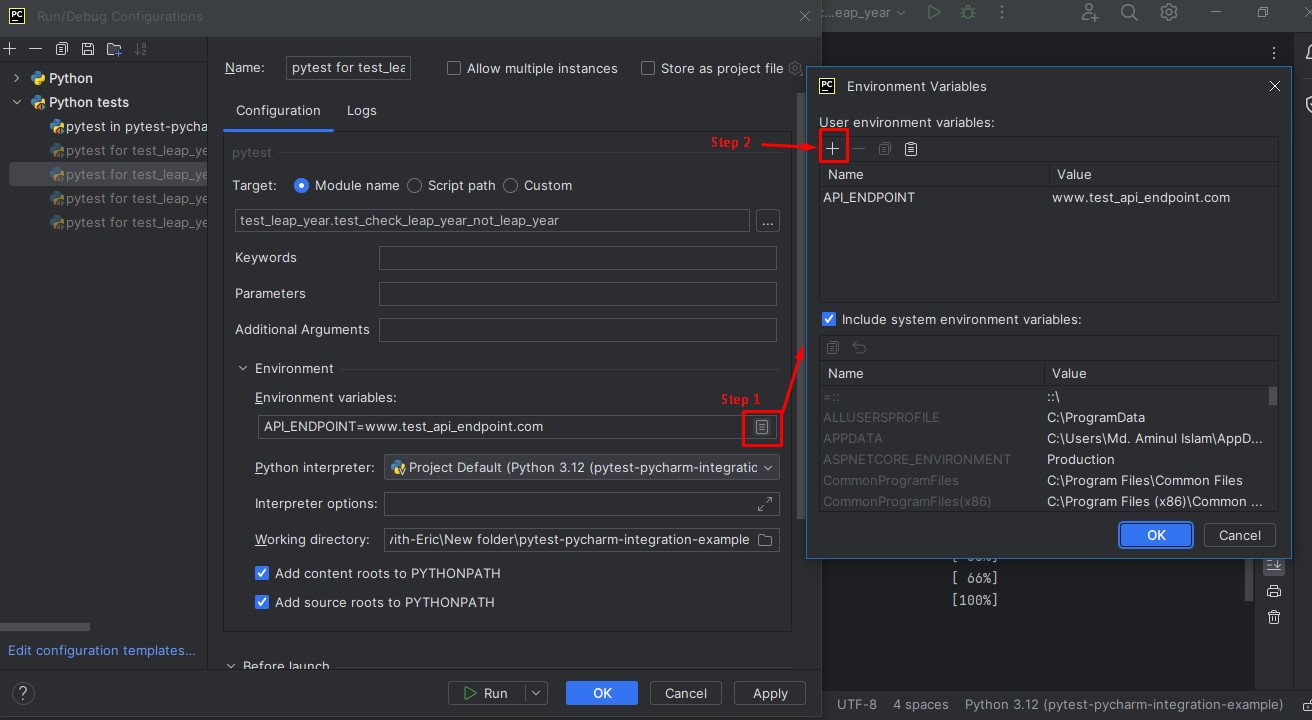
This article teaches you how to define and use environment variables in Pytest.
- Python Interpreter: Choose the Python interpreter to be used. You can also add a new interpreter by clicking the gear icon and selecting the desired interpreter.
- Working directory: Specify a directory to be used as the working directory for the test run.
- Add content roots to PYTHONPATH: Checkbox to add all content roots of your project to the environment variable PYTHONPATH;
- Add source roots to PYTHONPATH: Checkbox to add all source roots of your project to the environment variable PYTHONPATH;
You’ll find more details about these options here.
You may also provide these options in Pytest configuration files like pytest.ini, pyproject.toml, setup.cfg, and tox.ini.
This guide will show you how.
Running Tests
To run tests, click on the Play icon at the top of the window,

It will run all the tests inside the tests/ directory,

Notice the screenshot and see how PyCharm marks a failed and passed test.
You can also run single tests by using the Play icon on the left side of each function,
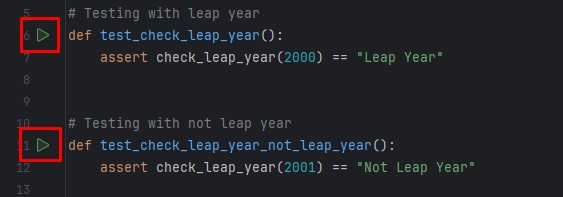
Now, you have the test results for a single test function,

Installing Pytest Manually
You can also manually install Pytest manually should you choose to do so.
To install Pytest manually, go to the bottom left corner of the window and click the Stack icon.
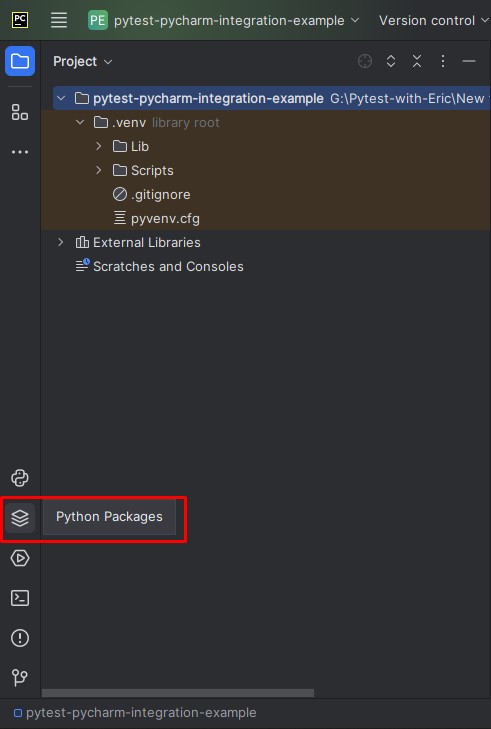
Now, search for Pytest, and you’ll see it at the top under the PyPI section.

Click on it and you’ll find the Install package option at the right.

After the successful installation of Pytest. You’ll see a message like the one below,

Troubleshooting Common Issues
Failed to create virtual environment in PyCharm or PyCharm doesn’t recognize the virtual environment
When you launch a project, Pycharm prompts you to create or use a virtual environment. However, PyCharm occasionally displays an error message when creating or failing to detect your venv and doesn’t recognize your package.
To resolve, delete the existing venv folder to allow PyCharm to recreate it. Reinstall the python3-venv package if the issue persists.
Alternatively, navigate to File > Settings > Project:YOUR_PROJECT > Python Interpreter > Add Interpreter > Add Local Interpreter to add a new virtual environment or locate an existing virtual environment.
No module named ‘pytest’ within PyCharm
Sometimes when executing tests, you might encounter an error message such as “ModuleNotFoundError: No module named ‘pytest’”. This hiccup often occurs after upgrading your PyCharm version or when Pycharm has issues with your virtual environment.
To fix this, reinstall the package following the official documentation by JetBrains.
You can also try to install pytest manually as described in the previous section.
FileNotFoundException in PyCharm
When running tests, you may encounter a FileNotFoundException error. This occurs when PyCharm fails to detect tests or the test files are placed incorrectly within the directory structure.
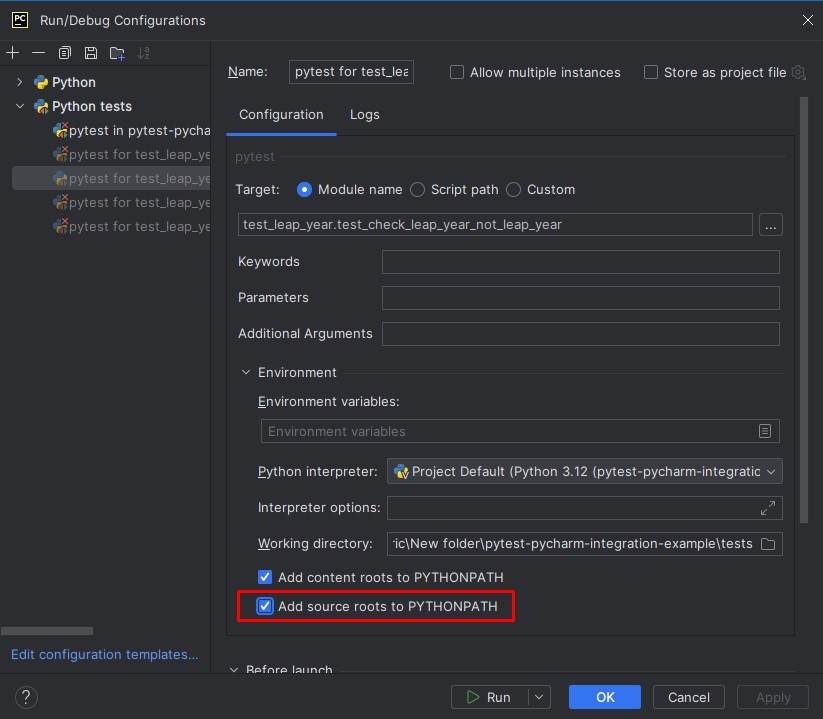
To fix it, ensure tests are placed in the correct directory. Then, navigate to Run > Edit Configuration and execute tests from the root directory by enabling “Add source roots to PYTHONPATH”.
Pytest-html error in PyCharm
You can generate an HTML report by installing the pytest-html plugin. However, occasionally, when running tests, you may encounter the following error:1
ERROR: file not found: html=report\result.html
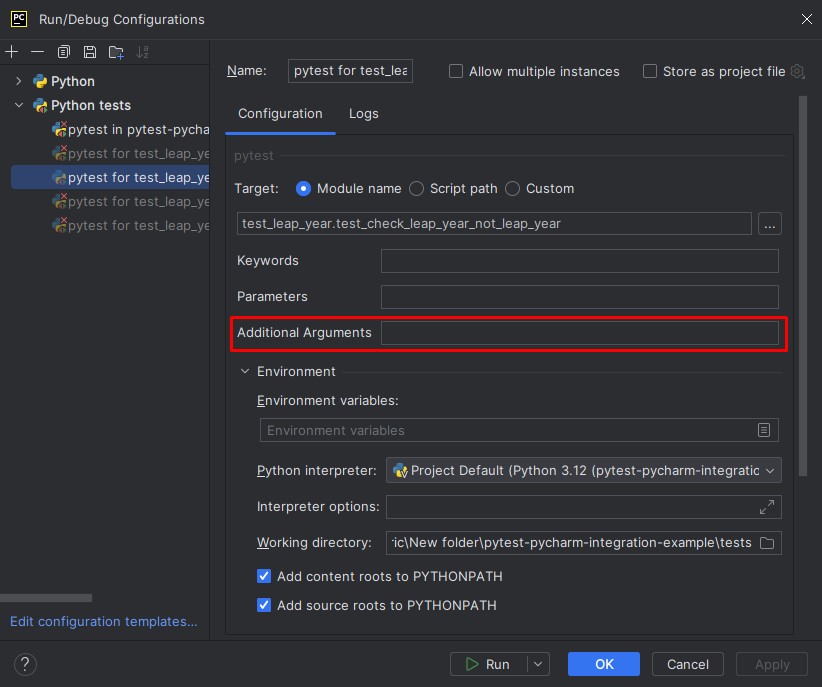
To fix it, go to Run > Edit Configuration and provide the following argument in the “Additional argument” section.1
--html=Reports/Report.html --self-contained-html
Code Coverage (Professional Edition Only)
A Coverage Report shows how a % measure of code that has been validated using a Unit Testing Framework (e.g. Unittest or Pytest).
This article covers coverage reports in depth.
To create a coverage report, open your preferred test file and left-click on it. Now, click the Run with Coverage option.
You can view the coverage data by clicking on the Shield symbol in the upper right corner. Feel free to experiment with the PyCharm Professional Edition to see the coverage report.

Conclusion
That’s all for this article.
This comprehensive guide walks you through setting up and configuring Pytest in the PyCharm IDE. Pycharm is a great IDE and honestly one of my favourites for writing pure Python code.
You learned to create projects, open existing repositories and detect or write tests in PyCharm.
You also learned how to execute tests using Pytest in PyCharm, debug tests, and resolve common errors that may occur while working with Pytest in PyCharm.
Importantly, you explored how to define Pytest configuration like environment variables, verbosity, custom arguments and more, right within PyCharm, saving you time and effort.
This handy tool can save you time and effort, for once you’ve set it up you don’t have to worry about running tests manually or managing the configurations yourself, PyCharm does it all for you.
Happy Testing! 🎉
If you have any ideas for improvement or like me to cover any topics please comment below or send me a message via Twitter, GitHub or Email.
Additional Reading
Example Code
How To Run Pytest In VS Code (Easy To Follow Step-By-Step Tutorial)
How Pytest Fixtures Can Help You Write More Readable And Efficient Tests
How to Effortlessly Generate Unit Test Cases with Pytest Parameterized Tests
3 Simple Ways To Define Your Pytest Environment Variables With Examples
Pytest Config Files - A Practical Guide To Good Config Management
How To Generate Beautiful & Comprehensive Pytest Code Coverage Reports (With Example)
How To Debug Failing Tests Like A Pro (Use Pytest Verbosity Options)
How To Use Pytest With Command Line Options (Easy To Follow Guide)
Jetbrains - Run/Debug Configuration: pytest
Jetbrains - Pytest