How To Run Pytest In VS Code (Easy To Follow Step-By-Step Tutorial)
As a Python developer, you’re likely familiar with Pytest, the popular Unit Testing framework.
It’s a powerful tool to test your Python programs using easy and concise syntax, with a plethora of built-in functionality and Pytest plugins to enhance your testing experience.
Most developers use the CLI to run tests. But it’s actually possible (and easier) to run tests with just a single mouse click. You might be wondering, “Really? But how?”.
If you’re using VS Code then you can set it up in just a few minutes. Saving you countless hours in iterative development and testing time.
This article will guide you through setting up Pytest in your VS Code environment. You’ll learn how to set up and configure Pytest on VS Code including automatic test discovery (and manually if auto-discovery fails).
We’ll use a basic Python module (simple calculator) to demo the testing process in VS Code.
Let’s get into it.
Objectives
By the end of this article you should be able to:
- Set up and configure Pytest in VS Code
- Automate test discovery in VS Code
- Execute the test using Pytest in VS Code
Why Pytest In VS Code?
Visual Studio Code (VS Code) is very popular among developers for its extensive features, ease of use, impressive customizability, and a large number of extensions.
It contains an embedded terminal that allows you to execute any CLI command instantly without opening the Command Prompt separately.
Besides there are thousands of extensions available for numerous programming languages, tools, and frameworks allowing you to customize your environment based on needs.
VS Code contains features like IntelliSense (Code suggestions), syntax highlighting, error checking, linting and bug highlighting.
According to a Stack Overflow Developer Survey 2023, about 73.71% of developers (amateur and professional) use it as their primary developer environment tool and with embedded AI (likes of GitHub CoPilot and chat) it’s getting ever more popular.
If you’re a Python developer then it’s likely you write Unit Tests as part of the job. With VS Code, there’s less need to run several CLI commands to execute tests.
You can set it up once and then it’s just a matter of clicking a button in VS Code.
OK enough said, let’s look at how to practically do this.
Prerequisites
Before we set up Pytest in VS Code, you need to install the below prerequisites in your operating system,
- Python
- VS Code (Version: 1.81.0 in this example)
Setting Up Pytest In VS Code
To set up Pytest in VS Code, follow the steps described below,
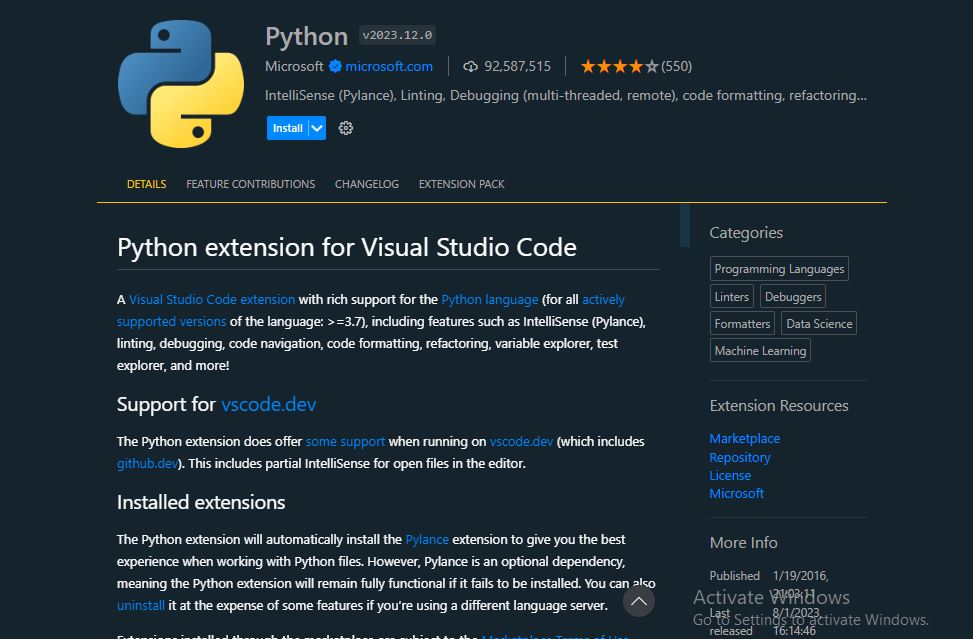
Step 1 - Install Python Extension
This is the first step where we are going to install the Python extension in VS Code. Open your VS Code and search for Python on the extension search engine. You’ll find the Python extension at the top of the search result. Open and install it.
Step 2 - Configure Pytest
Now the Python extension installation will automatically install Pytest on your environment. All you need to do is just configure Pytest. Follow the below steps to configure Pytest.
Step 1: Click the flask icon on the left tool bar. You can find this once you open a repository that contains Python unit tests.
Step 2: Now click on “Configure Python Tests”,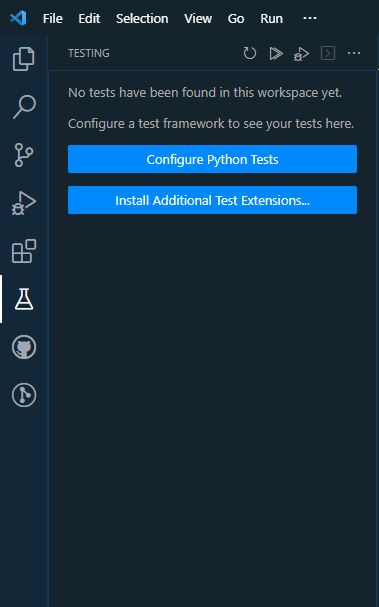
Step 3: You’ll have two options to select. Select Pytest here.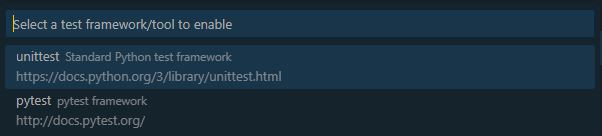
Step 4: Select the folder that contains the test code.
Step 5: Assuming your tests were discovered, click on the play icon to run the test.
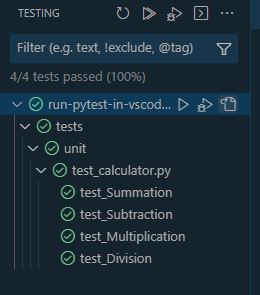
Step 6: You’ll see a green tick when the testing is completed.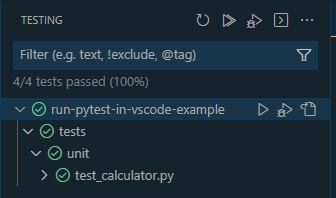
Note - Please note that for Auto Discovery to work, you need to have a __init__.py file in your test folder as well as open a single repository folder in VS Code Workspace (as VS Code may not discover tests if you’re in a directory containing several repos).
Test Discovery In VS Code
After configuring Pytest, VS Code will automatically discover your Unit Tests. You can customise which folder to look for tests in the settings under "python.testing.cwd" parameter in the .vscode/settings.json file.
For e.g.vscode/settings.json1
2
3
4
5
6
7
8
9
10
11{
"files.autoSave": "onFocusChange",
"[python]": {
"editor.defaultFormatter": "ms-python.black-formatter"
},
"python.testing.pytestArgs": [],
"python.testing.unittestEnabled": false,
"python.testing.pytestEnabled": true,
"python.testing.cwd": "${workspaceFolder}/tests",
"python.testing.autoTestDiscoverOnSaveEnabled": true,
}
You can see I’ve set it to look for tests in the tests folder.
And for Pytest to detect your Python file as a unit test, don’t forget to use test as a prefix or suffix in your file name. For e.g test_example.py.
Manual Test Discovery (If Auto-Discovery Fails)
Test discovery is an automatic feature that detects your tests or notifies you if tests are not detected.
It will automatically initiate when you enable Pytest for your Python project. But you can run it manually by following the steps below,
Step 1: Open Command Palette from View > Command Palette or by pressing Ctrl+Shift+P.
Step 2: Search for “Test: Refresh Tests“ and click on it.
Now if don’t have any errors, you’ll see that the tests are discovered successfully.
Or if you have any file missing or error in your testing file or code then you’ll see an error message like the one below,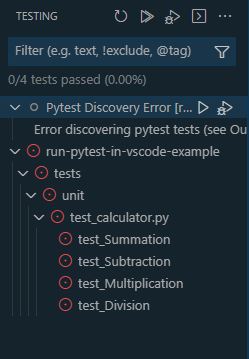
If you experience any errors during Test Discovery, please ensure that your test file is located in the correct directory and that there are no errors in your test code.
Now that we’ve successfully set up and configured Pytest in VS Code. Let’s perform a simple test in our VS Code environment.
Example Code
We will start by creating a simple project. The Python code shared below is a simple calculator program that performs mathematical operations between two variables.
src/calculator.py1
2
3
4
5
6
7
8
9
10
11
12
13
14
15
16
17
18
19
20
21
22
23
24
25
26
27
28"""
Python code to perform mathematical operations on two variable
"""
def summation(num1: int, num2: int) -> int:
"""
Calculate the summation of two number
"""
return num1 + num2
def subtraction(num1: int, num2: int) -> int:
"""
Calculate the subtraction of two number
"""
return num1 - num2
def multiplication(num1: int, num2: int) -> int:
"""
Calculate the multiplication of two number
"""
return num1 * num2
def division(num1: int, num2: int) -> float:
"""
Calculate the division of two number
"""
return num1 / num2
Tests
Let’s create a test for our calculator program. Here is a simple example of a test code,
tests/unit/test_calculator.py1
2
3
4
5
6
7
8
9
10
11
12
13
14
15
16
17
18
19
20
21
22
23
24
25
26
27
28
29
30
31
32
33
34
35
36
37
38from src.calculator import (
summation,
subtraction,
multiplication,
division
)
def test_summation():
"""
Testing Summation function
"""
assert summation(2, 10) == 12
assert summation(3, 5) == 8
assert summation(4, 6) == 10
def test_subtraction():
"""
Testing Subtraction function
"""
assert subtraction(8, 2) == 6
assert subtraction(7, 5) == 2
assert subtraction(4, 2) == 2
def test_multiplication():
"""
Testing Multiplication function
"""
assert multiplication(2, 2) == 4
assert multiplication(7, 2) == 14
assert multiplication(10, 2) == 20
def test_Division():
"""
Testing Division function
"""
assert division(5, 5) == 1
assert division(70, 10) == 7
assert division(16, 4) == 4
Running The Test
Now that we have a simple Python program, let’s test it by following the steps described above in this article.

You can also run a single Unit Test by clicking on the little green play icon next to the test.
You can see how incredibly useful this is to iteratively test/debug your Unit Tests.
It’s also possible to define config and other settings like runtime Environment Variables for your tests but that’s a topic for another day.
Meanwhile if you want to learn how to do this, we have an interesting article on setting Pytest Environment Variables and Pytest config using Pytest.ini.
Conclusion
Pytest is an amazing testing framework and combining it with VS Code makes the testing process easier and time efficient.
In this article you learnt to set up and configure Pytest in your VS Code environment.
By automating the repeat work, you can save time from manually passing CLI commands, config or environment variables.
VS Code will automatically discover tests and if this doesn’t work there are other ways to manually discover your tests.
By leveraging this knowledge, you can improve your testing process to be more efficient.
If you have ideas for improvement or like for me to cover anything specific, please send me a message via Twitter, GitHub, or Email.
Happy coding… Cheers!
Additional Reading
- https://code.visualstudio.com/docs/python/testing
- https://graycode.ie/blog/how-to-set-up-testing-explorer-with-python-pytest-in-vscode/
- https://python.plainenglish.io/how-to-autorun-python-tests-in-vscode-step-by-step-cfb24c6fc4be
- https://dzone.com/articles/vs-code-setup-for-python-development-and-testing
- https://www.youtube.com/watch?v=ucjRpS7WCPA