How To Debug Failing Tests Like A Pro (Use Pytest Verbosity Options)
Have you ever been stuck debugging a unit test, only to be overwhelmed by cryptic error messages? Maybe you can’t figure out which line of code is the culprit?
Debugging tests can be a real challenge, especially if you’re not very familiar with the testing framework.
What if there was a way to make debugging easier? A way to get more detailed information about test failures, so you could quickly pinpoint the problem?
Fortunately one exists, the verbose option in Pytest - pytest -v.
The -v option, known as “verbose” mode, may look simple, but it’s one of the most powerful Pytest command line flags.
The pytest -v option allows you to control the verbosity of Pytest output.
With pytest -v you can get detailed information about test failures, which make debugging tests much easier.
In this article, we’ll take a comprehensive look at the pytest -v option, go through the different verbosity levels and how to use them effectively.
We’ll also look at how to set up your tests to control the verbosity levels from the command line or configuration files.
Lastly, we’ll look at example code and use cases of the pytest -v option.
Let’s get into it.
What You’ll Learn
By the end of this article, you’ll learn:
- How to use Pytest’s in-built verbosity settings to help debug failing tests.
- Using various verbose modes (
-v,-vv, and-vvv) to control the amount of information and detail displayed during test execution. - Making the test output less verbose using the Quiet (
-q) flag. - Analysing Pytest verbose (
-v) outputs.
What is Verbosity?
In pytest, the verbosity level controls the amount of information displayed in your test results i.e. detailed information about the tests being run and their outcomes - passed, failed, or skipped.
This information is extremely useful for debugging tests and understanding what’s going on during test execution e.g. which tests are failing, why they’re failing, what values are being passed to the tests, etc.
Various levels of verbosity are available, such as -v, -vv, --verbose, and more. We will discuss these in detail later in this article.
Why is Verbosity Important?
Pytest -v option is a powerful tool for several important reasons:
Enhanced Reporting: It provides more detailed test reporting, making it easier to understand which tests passed, failed, or were skipped.
Debugging: It aids in debugging by displaying additional information about test execution, which can be crucial for identifying the root causes of test failures.
Clarity: It improves the clarity of test output, especially in larger test suites, by showing the names and statuses of individual test cases.
Verbosity Levels in Pytest
Pytest has several built-in verbosity levels, which can be controlled using the -v option. We’ll explain and demonstrate each of them in detail using example code.
For now let’s quickly review the different verbosity levels available in Pytest.
Low verbosity (-v):
- Lists each test function with its result (PASSED or FAILED).
- Provides a more detailed failure report than the default, but omits some common items in the failure diff. You get a hint like “Omitting 2 identical items, use -vv to show“ suggesting to use a higher verbosity level for full details.
1 | pytest -v |
Medium verbosity (-vv):
- Medium verbosity provides more detailed information than low verbosity.
- It displays additional information about test collection and execution.
- You’ll see the names of collected tests, setup and teardown steps, and more.
- Useful for debugging and understanding test execution flow.
1 | pytest -vv |
High verbosity (-vvv):
- High verbosity provides the most detailed information.
- It displays extensive information about each test, including captured stdout/stderr, local variables, and more.
- Useful for debugging complex test scenarios.
For High verbosity use the following command
Use the following command to run the test with high verbosity.1
pytest -vvv
Note that the output of -vv and -vvv will be similar if your code isn’t too much complex.
Project Setup
That’s enough theory, now let’s look at how this works.
First let’s set up our environment.
Prerequisites
To follow this guide, you should have:
- Python 3.11+ installed (recommend installing via Conda).
- An elementary grasp of Python and Pytest.
Getting Started
Our example repo looks something like this:
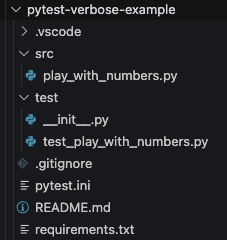
To get started. clone the Github Repo here, or you can create your own repo by creating a folder and running git init to initialize it.
In this project, we’ll be using Python 3.11.4.
Create a virtual environment and install any requirements (packages) using pip install -r requirements.txt.
Example Code
src/play_with_numbers.py1
2
3
4
5
6
7
8
9
10
11
12
13
14
15
16
17
18
19
20def smallest_number(num_list: list):
"""
Finds the smallest number from a list.
"""
num_list.sort()
return num_list[0]
def highest_number(num_list: list):
"""
Finds the highest number from a list.
"""
findmax = max(num_list)
return findmax
def number_to_string(str_len: int):
"""
Converts number to string.
"""
num_to_text = {str(x): x for x in range(str_len)}
return num_to_text
The above code consists of 3 simple functions. smallest_number(), highest_number(), and number_to_string().
The code documentation is self explanatory.
Test Code
Now our program is ready to go. Let’s test it.
Following is a simple test code that tests our code,
test/test_play_with_numbers.py1
2
3
4
5
6
7
8
9
10
11
12
13from src.play_with_numbers import smallest_number, highest_number, number_to_string
# Tests the smallest_number() function
def test_smallest_number():
assert smallest_number([10, 5, 9]) == 5
# Tests the highest_number() function
def test_highest_number():
assert highest_number([10, 5, 9]) == 10
# Tests the number_to_string() function
def test_number_to_text():
assert number_to_string(7) == number_to_string(5)
We have three different functions to test the functions in our example code.
Test Result
Our test code is ready for execution. It’s time to analyze our test result by employing different verbosity levels. Using only pytest, you’ll get the output like the below,1
pytest
Output in console:
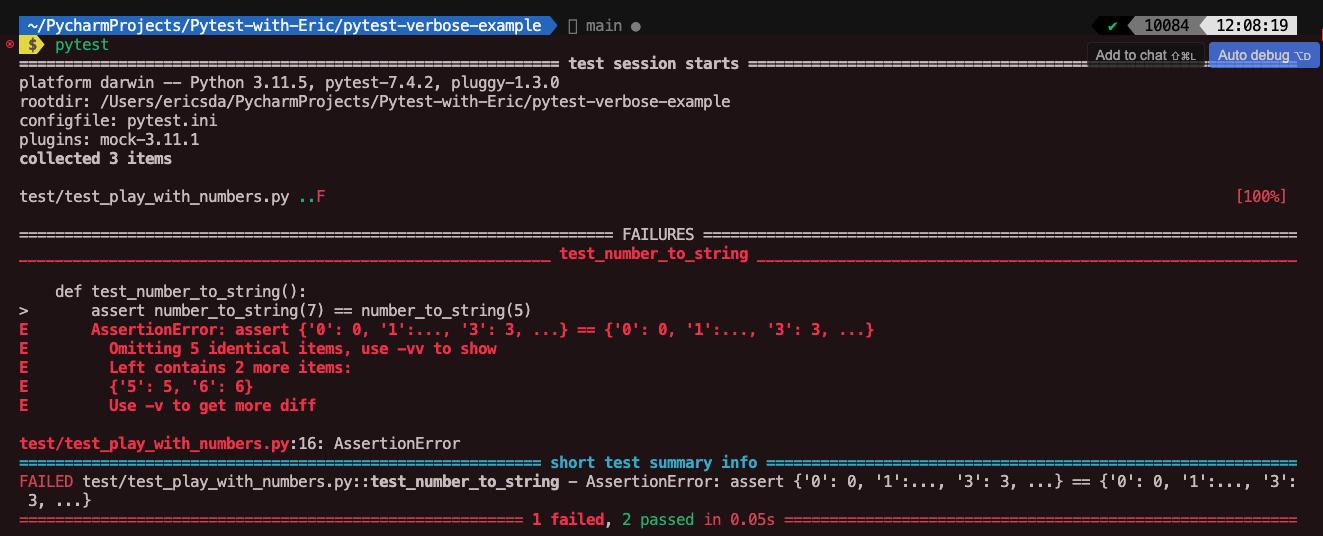
Notice that the result represents the pass and fail by using the single characters . and F. Also provides a short summary of the error that occurred during tests.
Analysing Result with Pytest -v
First, we’ll check the result with a low verbosity level,1
pytest -v
Output in console:
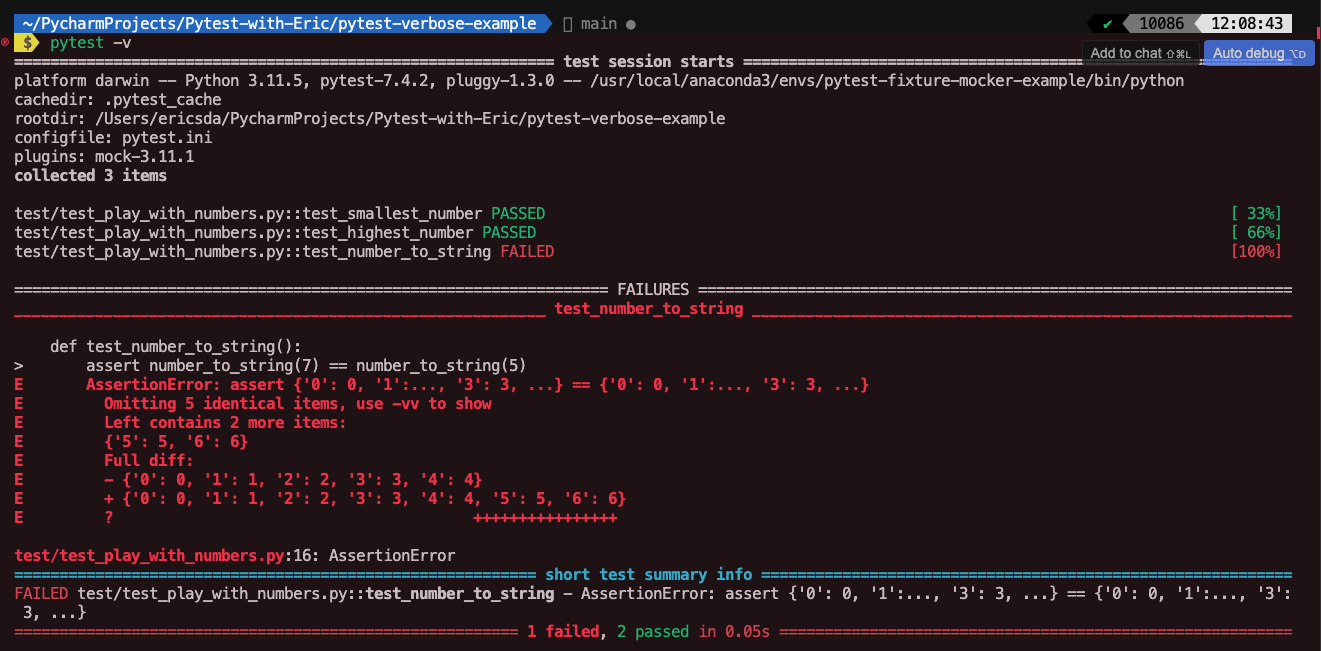
Notice that the result test_number_to_string() shows only two lines of the error and mentions using -vv to make the result more detailed i.e Omitting 5 identical items, use -vv to show
Analysing Result with Pytest -vv
Let’s move to the medium-level verbosity1
pytest -vv
Output in console:
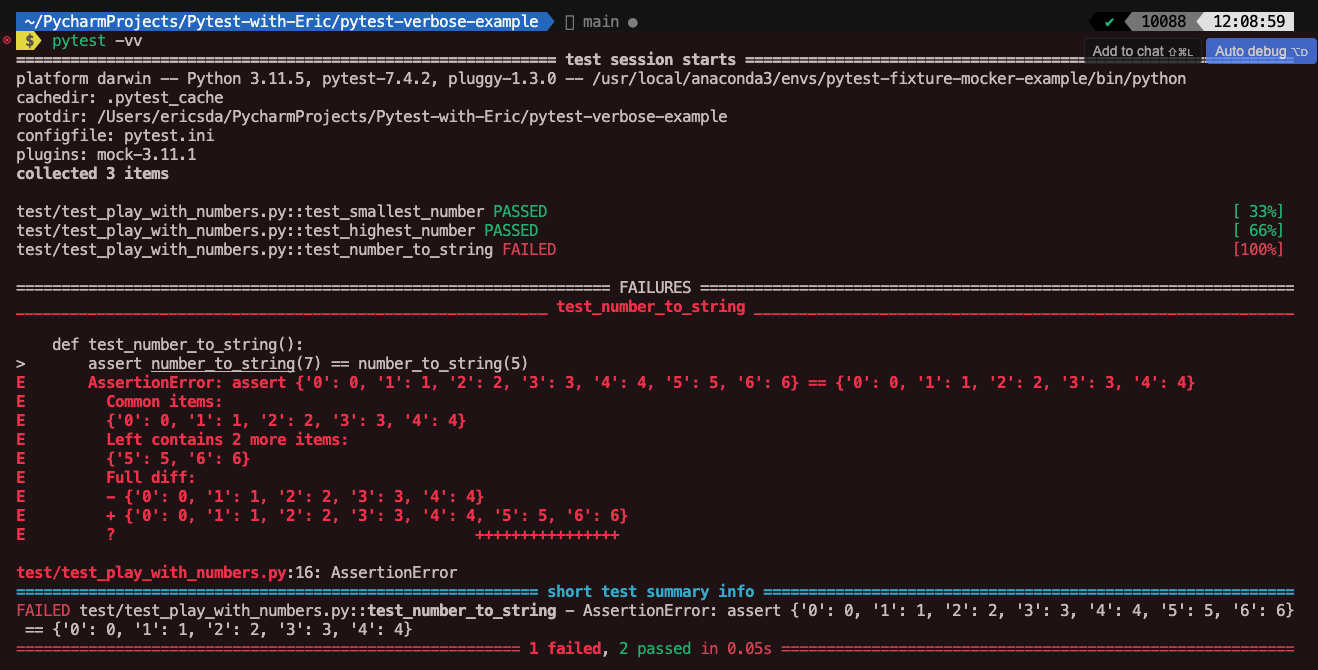
Now you can see the full details of the error in the test_number_to_string() function.
Analysing Result with Pytest -vvv
Let’s see what the test result looks like in high-level verbosity.1
pytest -vvv
Output in console:
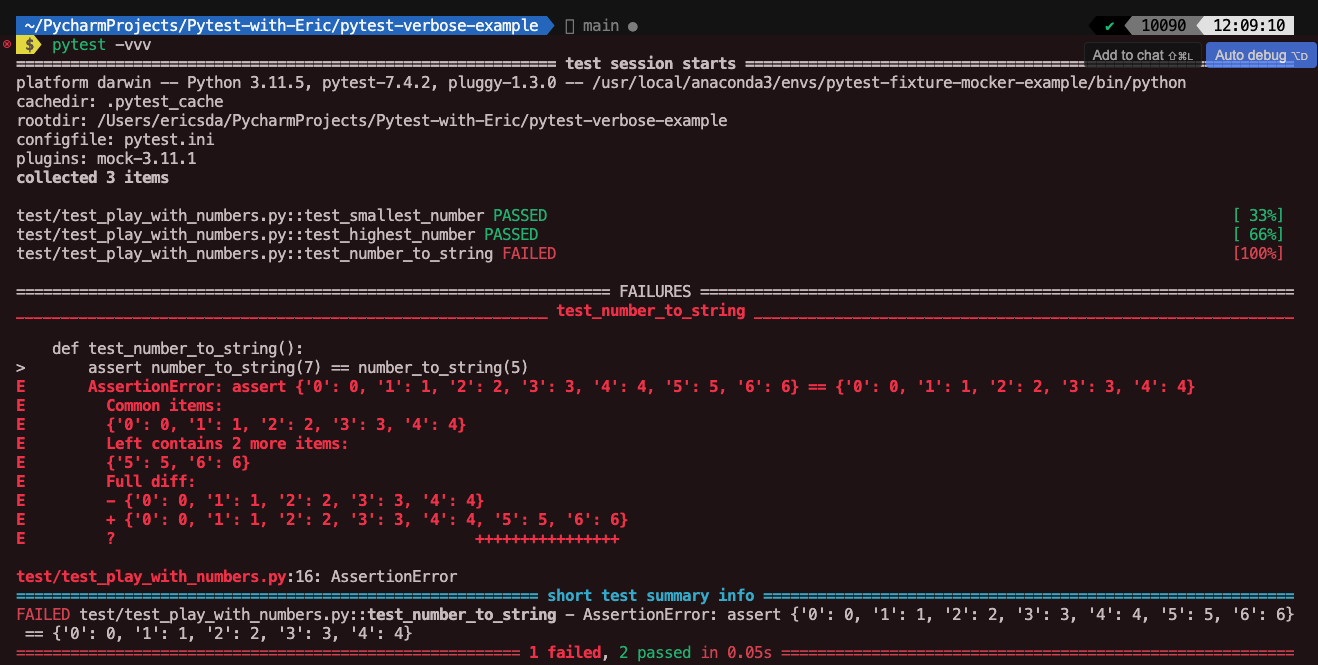
Note that -vv and -vvv mostly provides similar result.
Analysing Result with Pytest –quiet or -q
To make the test output less verbose and concise, you can use the -q or --quiet option.
This option reduces the amount of information displayed, showing only test summaries. Useful for running tests in a minimalistic, quiet mode.1
pytest -q
Output in console:

Notice that there is no test header and the result represents the pass and fail by using the single characters . and F. Also provides a very short summary of the error that occurred during tests.
Logging with Pytest Verbosity
You can enhance your logging experience by utilizing Pytest’s verbosity feature. Pytest logging empowers you to not only create but also override log handlers within the Pytest framework.
The following code snippet defined in the Pytest Config File (pytest.ini) provides an example of configuring Pytest logging alongside adjusting pytest verbosity settings.1
2
3
4[pytest]
addopts = -v
log_cli = True
log_cli_level = INFO
We used the Pytest addoptions feature to define the pass command line arguments directly to Pytest and specify the default verbosity level.
Configuring pytest.ini for Verbosity Levels
While the command-line option pytest -v is great for one-off test runs, sometimes you might want to set a default verbosity level for all your test runs.
This is especially useful in larger projects where you might have CI/CD pipelines or when multiple team members are working on the same project.
Pytest allows you to set default configurations using a pytest.ini file. If you’re not famliar with Pytest Config Files - like pytest.ini this article provides a solid base.
Here’s how you can configure verbosity levels in the pytest.ini file:
Step-1: This step can be skipped if you have a pytest.ini file already in the root of your project. If you don’t have Pytest.ini, create it at the root of your project.
Step-2: Use the addopts settings to set the verbosity level. The addopts setting allows you to specify default command-line options.
For example, to set the default verbosity to “verbose” (equivalent to pytest -v), you would add the following to your pytest.ini file:1
2[pytest]
addopts = -v
If we try this for our current example code repo, we’ll get the below output display,
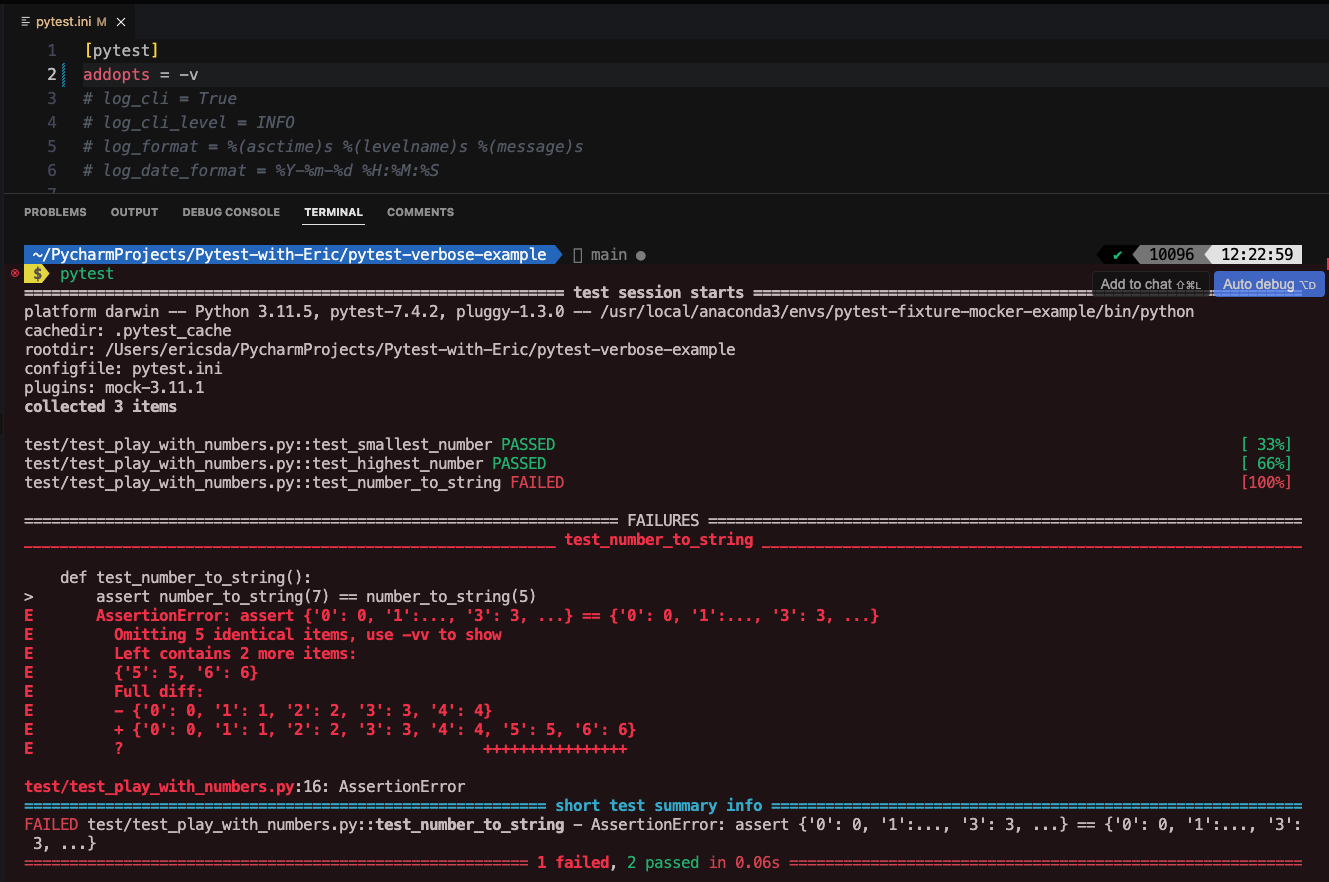
Similarly, you can update the default verbosity level to medium (-vv) or high (-vvv).
Practical Use Cases of Pytest -v Options
Here are practical real-world scenarios where pytest -v is beneficial:
Continuous Integration (CI): When running tests in a CI pipeline, pytest -v can help CI/CD tools easily parse test results and identify failures. The detailed output aids in quickly spotting issues during automated builds.
Debugging in Development: During the development phase, developers can use pytest -v to debug their code by running specific tests with verbose output. It provides insights into the behavior of code and test cases, making it easier to fix problems.
Regression Testing: When performing regression testing, it’s crucial to verify that existing functionality remains intact after code changes. Pytest -v ensures that developers and testers can clearly see which tests pass and which regressions occur.
Complex Test Suites: In complex applications with numerous test cases and fixtures, pytest -v simplifies the task of identifying the root cause of test failures. Testers can efficiently manage large test suites and maintain the reliability of test results.
Resource Management: When tests involve the allocation and release of resources (e.g., databases, files), pytest -v helps ensure that fixtures are set up and torn down correctly.
Conclusion
At the conclusion, let’s briefly recap the objectives we’ve achieved in this session:
First and foremost, we explored the Pytest verbose option and learned how to utilize it with varying levels of verbosity to manage the test result output effectively.
Next, we delved into the topic through a concise discussion, using a practical example to demonstrate its working.
Following that, we discussed some advanced topics related to the Pytest -v option.
This included overriding the default verbosity level and configuring pytest.ini to accommodate different verbosity levels and the quiet -q mode among other aspects.
Lastly, we examined the advantages of employing the Pytest verbose (-v) option.
The pytest -v option is not just a feature; it’s a revolution in how we perceive test results. As you embark on your testing journey, remember that with verbosity comes clarity. Embrace it, and watch your testing woes diminish.
There are several other methods to enhance your test outputs including tools like pytest sugar to make your outputs cleaner. It’s worth a quick check in.
That’s all for now.
If you have ideas for improvement or like me to cover anything specific, please send me a message via Twitter, GitHub or Email.
Additional Reading
Managing pytest’s output
What Is pytest.ini And How To Save Time Using Pytest Config
How To Use Pytest Logging And Print To Console And File (A Comprehensive Guide)
8 Useful Pytest Plugins To Make Your Python Unit Tests Easier, Faster and Prettier
How To Use Pytest With Command Line Options (Easy To Follow Guide)