How To Create Custom HTML Test Reports With pytest-html
Testing Python code is crucial for improving code quality and detecting bugs or unintended behavior.
But what about the test results?
How do you communicate the test results with colleagues, managers, and QA teams or send it to an external system?
One way is to build an API and POST the results, take screenshots, or use another complex system. All are not very user-friendly options.
But there’s an easier way. A user-friendly one.
Pytest offers a simple plugin — pytest-html that lets you create highly customizable test HTML reports.
In this article, you’ll learn everything you need about pytest-html to start creating and sharing beautiful test reports today.
You’ll learn the basics of generating test reports and how to customize your reporting to suit your project needs.
Lastly, you’ll learn some best practices and how to combine HTML reports with coverage reports.
Let’s get started.
Why Create HTML Tests Reports?
Now you may wonder, why should I create HTML reports?
Can’t my colleagues just look at the terminal output?
Good question.
First, these reports provide a visually organized and easily navigable overview of test results, making it straightforward for you and your team to pinpoint failures and understand test coverage.
The clarity and structure of HTML reports improve communication among developers, testers, and stakeholders, ensuring everyone is on the same page.
Additionally, HTML reports can be archived, serving as a historical record of test outcomes, which is invaluable for tracking progress and regression issues over time.
Setting Up the Environment
Let’s get your hands dirty with the implementation.
Firstly, let’s set up your local environment.
Clone the example repository here.
This project uses Python 3.12 but should work with any recent version.
Install pytest and pytest-html packages via your favorite package and environment manager.
I use Poetry so I’m gonna go ahead and use that. If you’re not familiar with Poetry I highly recommend you start using it.
We covered how to set up and use Poetry in great detail here.1
2poetry add -G dev pytest
poetry add -G dev pytest-html
This will install the packages and specify them in your pyproject.toml and lock files.
Example Code
Our example code is a couple of simple tests.
tests/test_sample.py1
2
3
4
5
6
7
8
9
10
11
12
13
14
15
16
17
18import pytest
def add_numbers(a, b):
return a + b
def test_addition():
assert add_numbers(3, 4) == 7
def test_addition_failure():
assert add_numbers(5, 6) == 12 # This will fail
def test_addition_type_error():
with pytest.raises(TypeError):
add_numbers("three", "four")
We kept it simple deliberately so we could focus on the reporting.
Here we have a combination of passing and failing tests.
Let’s use the plugin to generate a basic report.
Core Features of the Pytest HTML Plugin
Let’s run the tests.1
poetry shell
1
pytest --html=report.html
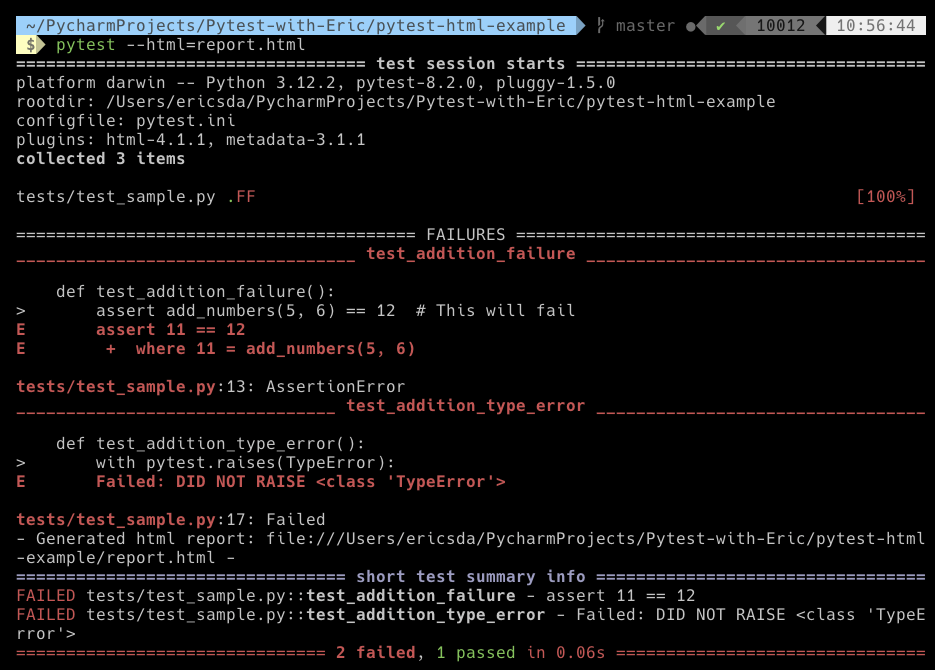
The --html=report.html flag tells Pytest to generate an HTML report in this directory and call it report.html . You can use any filename you like.
If you navigate to the current directory, you’ll see the HTML report. Open it in your browser.
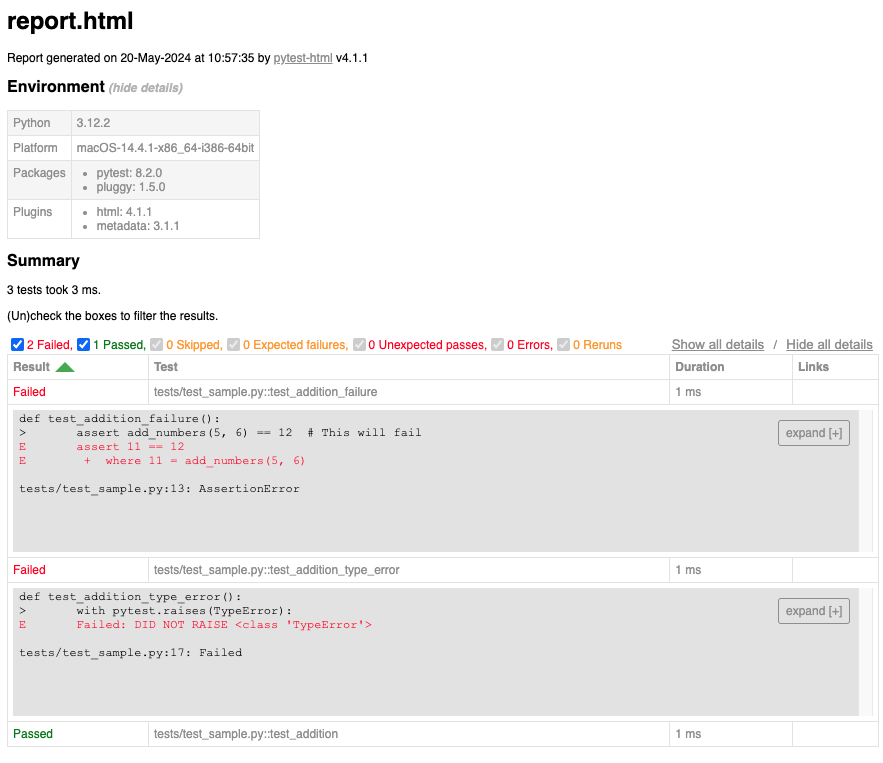
It contains an Environment and Summary section
Environment— Shows details like the machine on which the test was run. (Mac, Windows etc.), Python version, packages, and plugins.Summary— Shows a summary of passed and failed tests with output.
You can interactively engage with the report via the checkboxes.
This report is static for each run and can be shared and analyzed very easily.
Now that you have the basics down, let’s look at how to customize the report.
Customizing HTML Reports
Let’s look at simple customization options offered by pytest-html .
Change Title
The default title will be the name of your HTML file. But you can easily change that by using the pytest_html_report_title hook.
Stick the hooks in your conftest.py file.
tests/conftest.py1
2def pytest_html_report_title(report):
report.title = "Pytest HTML Report Example"
Let’s regenerate our report.1
pytest --html=report.html
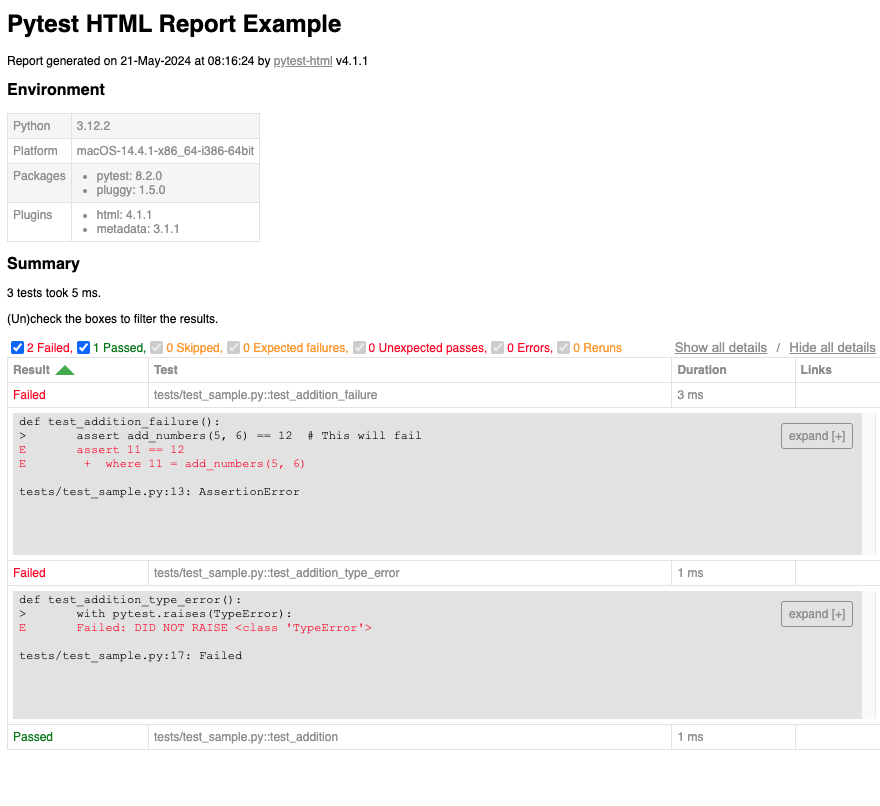
You can observe the title has changed.
Next, let’s add a project name.
Add Project Name
In your conftest.py file, make use of the pytest_configure hook.
tests/conftest.py1
2
3
4from pytest_metadata.plugin import metadata_key
def pytest_configure(config):
config.stash[metadata_key]["Project"] = "Pytest With Eric"
Let’s generate the report.
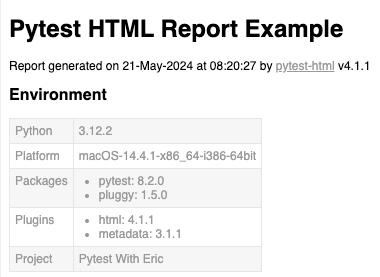
Note the Project key has been added.
If you’ve not used the pytest_configure hook before I highly recommend you read about it as it allows you to do some pretty cool stuff in Pytest.
Great, your knowledge is growing, let’s look at how to add screenshots.
Perhaps you’re running Selenium automation tests with Pytest or just wanna share some images, here’s how we can add images to the report.
Add Images
tests/conftest.py1
2
3
4
5
6
7
8
9
10
11
12
13
14
15
16
17
18
19
20
21
22
23
24
25
26
27
28
29import base64
import os
import pytest
import pytest_html
from pytest_metadata.plugin import metadata_key
def pytest_html_report_title(report):
    report.title = "Pytest HTML Report Example"
def pytest_configure(config):
config.stash[metadata_key]["Project"] = "Pytest With Eric"
def pytest_runtest_makereport(item):
outcome = yield
report = outcome.get_result()
extra = getattr(report, "extra", [])
if report.when == "call":
# Assuming your screenshot is saved correctly at the specified path
screenshot_path = os.getenv("SCREENSHOT_PATH", "./test_screenshot.png")
with open(screenshot_path, "rb") as image_file:
encoded_string = base64.b64encode(
image_file.read()
).decode() # https://github.com/pytest-dev/pytest-html/issues/265
extra.append(pytest_html.extras.png(encoded_string))
report.extra = extra
If you observe the last hook pytest_runtest_makereport you’ll see that we leverage some boilerplate code to add the report attributes.
In this case, we’ve added a screenshot test_screenshot.png to each test.
Note — you have to encode and decode the image before Pytest can read it (seems like it’s a bug in the plugin).
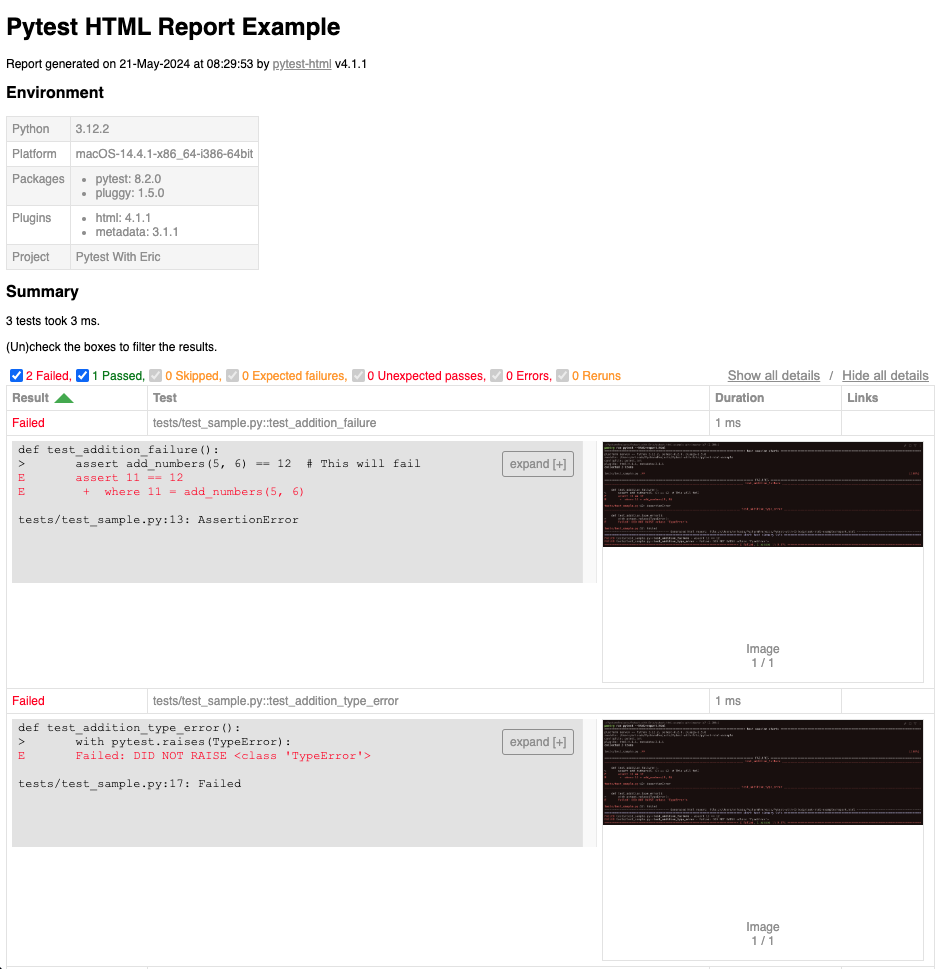
You can add various conditions like — add images to only failing tests, passing tests, grab an image from a URL and so on.
Here are the official docs if you wish to read through them and do your own customization.
Use pytest-html with GitHub Actions
If you’re wondering how to integrate Pytest with GitHub actions i.e. to run your tests as part of a CI/CD pipeline, I’ve covered that in this article.
To generate HTML reports, the only changes you need to make are
- Add
pytest-htmlas a dependency - Add another step in the workflow for report generation i.e run
pytest --html=report.htmlor whatever name you choose - Include any specification as hooks in
conftest.py
Combine Coverage Reports with pytest-html
Coverage reports are also very powerful test reports.
They show the % of source code that has been tested.
Of course, it only shows the % of code you’ve tested against what you wrote and has little relevance to whether your code has bugs or not.
This article goes into great detail about Pytest coverage reports so I highly recommend you read it and practice.
Sharing HTML and Coverage reports with your QA team or other developers as part of a PR can be a very powerful way to understand what testing has occurred and the results over time.
Maybe you could even generate both as part of your CI/CD pipeline, zip it, and store it in secure storage for auditing or analyzing.
The possibilities are endless.
Best Practices
Let’s learn some best practices when working with the pytest-html plugin to generate test reports.
- Consistent Reporting — Maintain consistency in report generation across different environments and stages of development to ensure that reports are always relevant and easy to compare.
- Report Management— Name reports with timestamps or unique identifiers to avoid overwriting. Archive older reports that are no longer needed.
- Automate Reporting — Automating report generation and distribution as part of your CI/CD Pipeline will make the process consistent and repeatable.
- Security Considerations — Restrict access to test reports so only relevant people can access them. Avoid sensitive data in reports unless necessary. Use secure storage and transfer methods for report files.
Conclusion
OK, I hope you found this useful.
In this article, you learned about the pytest-html plugin and how to use it to generate test reports.
We explored how to customize the report like adding a project name, changing the title, and even adding images.
There’s loads more of customization you can do and we only scratched the surface.
pytest-html is a fantastic plugin and when combined with other plugins like pytest-coverage, it gives a good insight into the test results and ultimately more confidence in the code you’re releasing.
Combined with CI/CD tooling, this is a game changer.
I recommend you clone the repo or even start your own from scratch and try out the pytest-html plugin, and play around with the customization and hooks.
It will improve your skills and demonstrate the value of your tests to others.
If you have any ideas for improvement or like me to cover any topics please comment below or send me a message via Twitter, GitHub or Email.
Till the next time… Cheers!
Additional Reading
Example Code Used
Poetry - Official Docs
How To Run Pytest With Poetry (A Step-by-Step Guide)
What Is The pytest_configure Hook? (A Simple Guide)
How To Use Pytest With Selenium For Web Automation Testing
pytest-html Official Docs
Automated Python Unit Testing Made Easy with Pytest and GitHub Actions
How To Generate Beautiful & Comprehensive Pytest Code Coverage Reports (With Example)
Introduction To Pytest Hooks (A Practical Guide For Beginners)