How To Measure And Improve Code Efficiency with Pytest Benchmark (The Ultimate Guide)
In our fast-paced world, every millisecond matters and user experience is paramount.
The importance of faster code faster cannot be overstated.
Beyond correct functioning, it’s imperative to ensure that it operates efficiently and consistently across varying workloads.
This is where performance testing and benchmarking step in to uncover bottlenecks, inefficiencies, and regressions.
Performance testing involves subjecting code to various stressors and scenarios to gauge responsiveness, stability, and scalability.
Benchmarking, on the other hand, is the process of measuring a piece of code’s execution time or resource usage to establish a performance baseline and track changes over time.
These practices are akin to stress-testing a sports car on a racetrack, ensuring it can handle both the winding curves and the straightaways with finesse.
In this dynamic landscape, Pytest benchmark is your powerful ally.
Built as an extension to the popular Pytest testing framework, it empowers you to not only ensure your code’s correctness but also gauge its efficiency seamlessly.
In this article, we embark on a journey to understand and unlock the potential of Pytest benchmark to help you produce better code.
We’ll explore Pytest benchmark and how to leverage it to compare different algorithms using a real example.
We’ll also learn Pytest benchmarking strategies, and how to interpret, save and compare results.
Sounds good? Let’s dive in.
Why Benchmark Your Code?
So why do you need to benchmark your code? Isn’t a first iteration good enough?
Not quite.
Firstly, it’s invaluable for optimizing algorithms and code snippets, identifying performance bottlenecks, and validating enhancements.
Secondly, it helps in version comparisons, ensuring that new releases maintain or improve performance.
Moreover, it contributes to hardware and platform compatibility testing, highlighting discrepancies in different environments.
In continuous integration pipelines, benchmarking acts as an early warning system, preventing performance regressions (meaning new code doesn’t affect previous performance).
Lastly, it helps us make informed technology choices by comparing the performance of various frameworks or libraries.
In essence, we can think of benchmarking as a compass guiding you toward efficient, stable, and high-performing software solutions.
Big O Notation
You may have heard of Big O Notation while preparing for interviews.
It offers a simplified view of an algorithm’s performance as the input grows larger.
It’s important to understand the basics to better appreciate benchmarking.
This notation focuses on the most significant factors affecting an algorithm’s runtime or resource usage, abstracting away finer details.
Represented as O(f(n)) (O as a function of N), it helps in comparing algorithms and predicting how they’ll scale.
For example, given a larger input, is your code execution time expected to scale linearly, exponentially, or logarithmically?
Or is the execution time independent of input size? i.e. takes the same time no matter how big the input.
Knowledge of Big O and performance can empower you to make informed choices, essential in the realm of performance testing.
You can find a lot of content online explaining Big O Notation but here are a couple I found valuable.
Introduction to Big O Notation and Time Complexity
Objectives
Let’s review what I hope for you to achieve by reading this article.
- A clear understanding of the need to benchmark your code especially when writing custom algorithms or complex data transformations.
- Knowledge and application of Pytest Benchmark to perform benchmark analysis of your code
- How to analyze benchmark results to choose the best algorithm for code snippets.
- Understanding of Pytest benchmarking strategies and choosing the best one for your testing suite.
- Save and compare benchmark results to share with others
Project Set Up
Prerequisites
To achieve the above objectives and wholly understand Pytest benchmark, the following is recommended:
- Basic knowledge of Python and data structures e.g. Lists, Strings, Tuples
- Basics of Pytest
- Some knowledge of algorithms e.g. bubble sort would be useful
But don’t worry if you’re not an algorithm wiz, I’ll link you to some helpful YouTube videos.
Getting Started
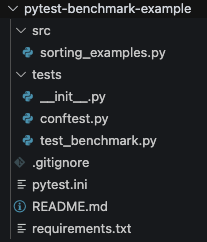
Here’s our repo structure

To get started, clone the repo here, or you can create your own repo by creating a folder and running git init to initialise it.
In this project, we’ll be using Python 3.11.4.
Create a virtual environment and install any requirements (packages) using1
pip install -r requirements.txt
Example Code
Here’s some simple example code to understand how Pytest benchmarking works.
Let’s look at some sorting algorithms. Our goal is to compare which algorithm performs the best for the same inpujt.
src/sorting_examples.py1
2
3
4
5
6
7
8
9
10
11
12
13
14
15
16
17
18
19
20
21
22
23
24
25
26
27
28
29
30
31
32
33
34
35
36
37
38
39
40
41
42
43
44
45
46
47
48
49
50
51
52
53
54
55
56
57
58
59
60
61
62
63
64
65
66
67
68
69
70
71
72
73
74
75
76def bubble_sort(input_list: list[int]) -> list[int]:
"""
Bubble sort algorithm.
Args:
input_list (list[int]): A list of numbers.
Returns:
list[int]: The sorted list.
"""
indexing_length = len(input_list) - 1 # Length of list - 1
sorted = False # Create variable of sorted and set it equal to false
while not sorted:
sorted = True # Break the while loop if sorted = True
for i in range(0, indexing_length): # For every value in the list
if (
input_list[i] > input_list[i + 1]
): # If the value we are on is greater than the next value
sorted = False # Then the list is not sorted
input_list[i], input_list[i + 1] = (
input_list[i + 1],
input_list[i],
) # Swap the values
return input_list # Return the sorted list
def quick_sort(input_list: list[int]) -> list[int]:
"""
Quick sort algorithm.
Args:
input_list (list[int]): A list of numbers.
Returns:
list[int]: The sorted list.
"""
length = len(input_list)
if length <= 1:
return input_list
else:
pivot = input_list.pop()
items_greater = []
items_lower = []
for item in input_list:
if item > pivot:
items_greater.append(item)
else:
items_lower.append(item)
return quick_sort(items_lower) + [pivot] + quick_sort(items_greater)
def insertion_sort(input_list) -> list[int]:
"""
Insertion sort algorithm.
Args:
input_list (list[int]): A list of numbers.
Returns:
list[int]: The sorted list.
"""
indexing_length = range(1, len(input_list))
for i in indexing_length:
value_to_sort = input_list[i]
while input_list[i - 1] > value_to_sort and i > 0:
input_list[i], input_list[i - 1] = input_list[i - 1], input_list[i]
i = i - 1
return input_list
Here we have 3 algorithms to sort a list (with links to explanations of how the algorithm works)
Test Example Code (Basic Benchmark Ex)
Let’s test our code using the pytest-benchmark plugin
tests/test_benchmark.py1
2
3
4
5
6
7
8
9
10
11
12
13
14
15
16
17
18
19
20
21
22
23
24
25
26
27
28
29
30
31
32
33
34
35
36
37
38
39import pytest
from src.sorting_examples import bubble_sort, quick_sort, insertion_sort
# Sorting - Small
def test_bubble_sort_small(sort_input1, benchmark):
result = benchmark(bubble_sort, sort_input1)
assert result == sorted(sort_input1)
def test_quick_sort_small(sort_input1, benchmark):
result = benchmark(quick_sort, sort_input1)
assert result == sorted(sort_input1)
def test_insertion_sort_small(sort_input1, benchmark):
result = benchmark(insertion_sort, sort_input1)
assert result == sorted(sort_input1)
# Sorting - Large
def test_bubble_sort_large(sort_input2, benchmark):
result = benchmark(bubble_sort, sort_input2)
assert result == sorted(sort_input2)
def test_quick_sort_large(sort_input2, benchmark):
result = benchmark(quick_sort, sort_input2)
assert result == sorted(sort_input2)
def test_insertion_sort_large(sort_input2, benchmark):
result = benchmark(insertion_sort, sort_input2)
assert result == sorted(sort_input2)
Here we have a few tests, 3 each for small and large input lists.
- Test Bubble Sort
- Test Quick Sort
- Test Insertion Sort
You can (and should) test this for a variety of inputs, however for the simplicity of this example we’ve just used 2, a small and larger list.
The input lists are defined as fixtures in conftest.py . If you need a refresher on Pytest conftest, please check out our article on the subject.
tests/conftest.py1
2
3
4
5
6
7
8
9
10
11
12
13
14
15
16
17
18
19
20
21
22
23
24
25
26
27
28
29
30
31
32
33
34
35
36import pytest
def sort_input1():
return [5, 1, 4, 2, 8, 9, 3, 7, 6, 0]
def sort_input2():
return [
5,
1,
4,
2,
8,
9,
3,
7,
6,
0,
10,
11,
12,
13,
14,
15,
16,
0,
-3,
-6,
4,
1,
9,
6,
10,
]
Input test data generation can also efficiently (and scalably) be done using Pytest Parameters and using the Hypothesis plugin.
If we re-examine one of the tests1
2
3
4
def test_bubble_sort_small(sort_input1, benchmark):
result = benchmark(bubble_sort, sort_input1)
assert result == sorted(sort_input1)
We pass the input fixture sort_input1 as an argument along with the benchmark argument.
We then call the benchmark class and pass 2 arguments — our function to be benchmarked (bubble_sort() in this case) and the input list to our function.
We then assert the result against the expected value as usual.
This approach validates our function bubble_sort() and benchmarks it against other tests.
Note the use of custom markers like @pytest.mark.sort_small and @pytest.mark.sort_largeto group tests making it easy to run just those tests.
Markers are popularly used in Pytest XFail and Skip Test.
Running the test using1
pytest -m sort_small -v -s

Analyzing Benchmark Results
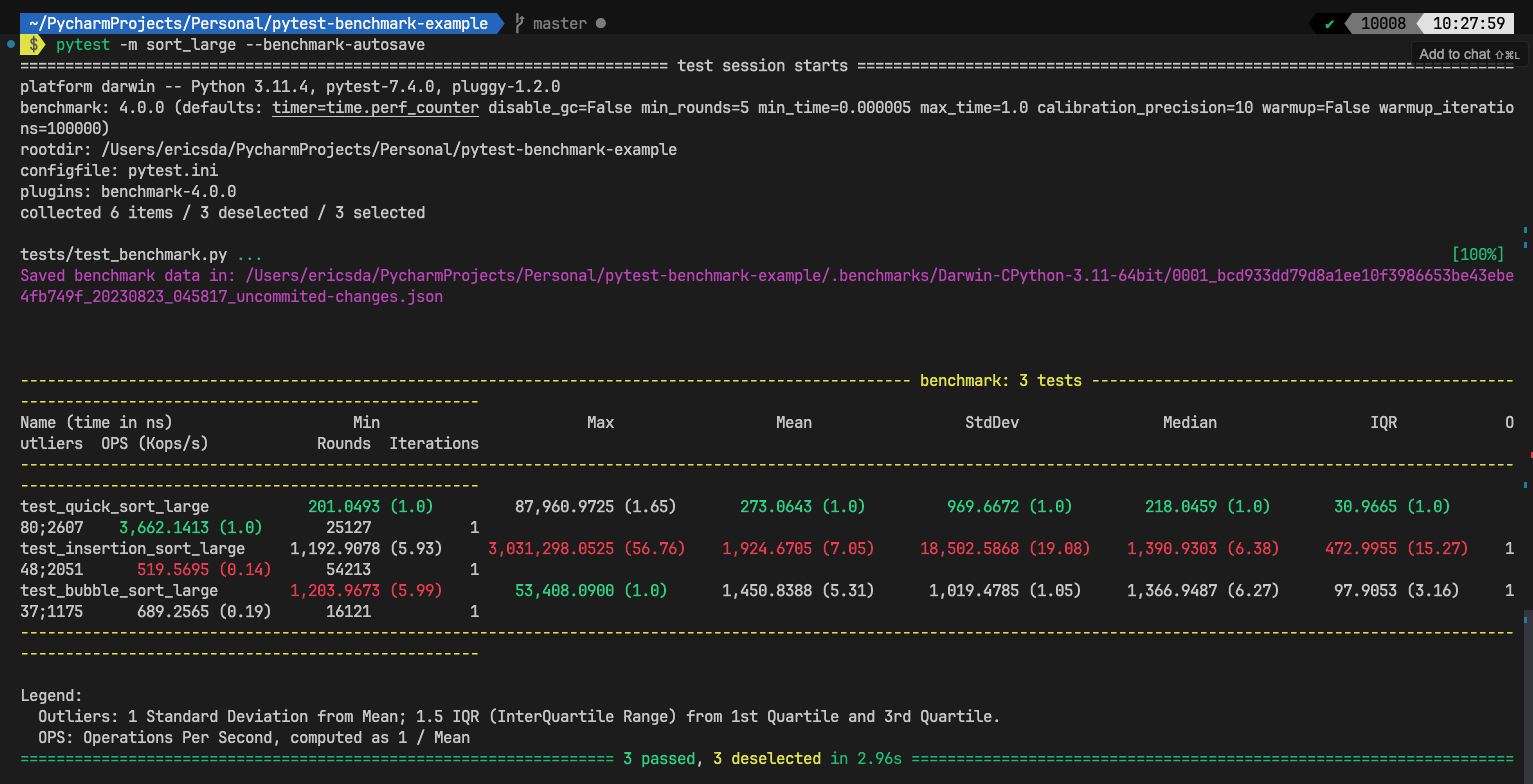
Now let’s analyze the above result.
We can see a nice comparison (with colours) of our 3 tests where red denotes slower running tests and green faster tests.
We have a few metrics like
- Min
- Max
- Mean
- StdDev
- Median
- IQR
- Outliers
- OPS (Mops/s)
- Rounds
- Iterations
Let’s briefly explore what they mean.
- Min Time: The shortest time among all iterations. This shows the best-case scenario for your code’s performance.
- Max Time: The longest time among all iterations. This shows the worst-case scenario for your code’s performance.
- Mean Time: The average time taken for all iterations of the benchmarked code to execute. This is often the most important metric as it gives you an idea of the typical performance of your code
- Std Deviation: The standard deviation of the execution times. It indicates how consistent the performance of your code is. Lower values suggest more consistent performance.
- Median Time: The middle value in the sorted list of execution times. This can be useful to understand the central tendency of your code’s performance and reduce the influence of outliers.
- IQR (Interquartile Range): A statistical measure that represents the range between the first quartile (25th percentile) and the third quartile (75th percentile) of a dataset. It’s used to measure the spread or dispersion of data points. In the context of benchmarking, the IQR can provide information about the variability of execution times across different benchmarking runs. A larger IQR could indicate more variability in performance, while a smaller IQR suggests more consistent performance.
- Outliers: Data points that significantly deviate from the rest of the data in a dataset. These data points are often located far away from the central tendency of the data, which includes the mean (average) or median (middle value).
- OPS (Operations Per Second) or Mops/s (Mega-Operations Per Second): Metrics used to quantify the rate at which a certain operation is performed by the code. It represents the number of operations completed in one second. The “Mega” in Mops/s refers to a million operations per second. These metrics are often used to assess the throughput or efficiency of a piece of code. Higher the better.
- Rounds: A benchmarking process involves multiple rounds, where each round consists of running the code multiple times to account for variations in performance caused by external factors.
- Iterations: Within each round, there are iterations. Iterations involve executing the code consecutively multiple times to capture variability and minimize the impact of noise.
For our benefit, tools like Pytest benchmark analyze these results and order them in order of best (green) to worst (red).
The important metrics are highlighted in colour and the focus on the mean is generally very useful.
Although you must test your code against a wide sample of input data using tools like Pytest parameters and Hypothesis to generate test data.
Benchmark Histogram
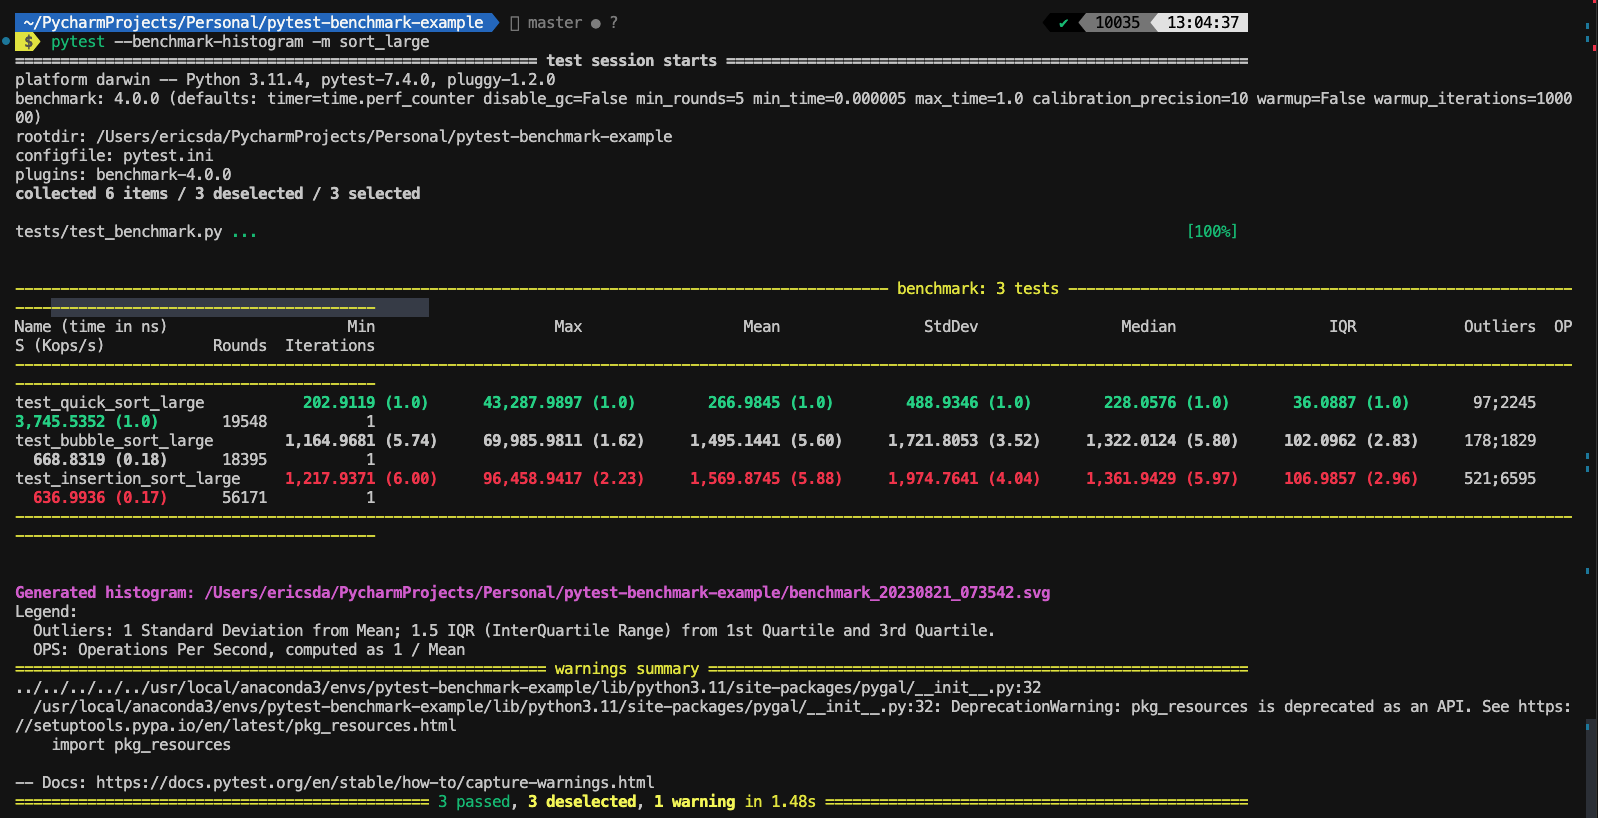
If you’re more the visual type and enjoy graphs, Pytest benchmark also has the option to generate Histograms.1
pytest --benchmark-histogram -m sort_large
This command will generate a histogram for the tests with a marker sort_large .

Here you can see the visual plotting showing our quick_sort algorithm outperforming the other two.
Even though we’ve just used one input list here for demo purposes, it’s important to benchmark your code using a variety of inputs rather than base it on just one.
Time-Based vs Iteration-Based Benchmarking
Time-Based Benchmarking:
By default, pytest-benchmark performs time-based benchmarking. It measures the execution time of the code under test and provides statistics about the timing of each run.
For example:1
2
3
4
5
6
7
8
9
10
11
12
13
14import pytest
# Function to benchmark
def expensive_operation():
total = 0
for i in range(1000000):
total += i
return total
# Benchmarking test
def test_expensive_operation(benchmark):
result = benchmark(expensive_operation)
assert result
In this example, pytest will run the expensive_operation function multiple times, measuring the execution time for each run.
It will then provide statistics such as minimum, maximum, average, and standard deviation of the execution times.
Iteration-Based Benchmarking:
While pytest-benchmark does not natively support iteration-based benchmarking, you can achieve it by manually running the benchmarked code in a loop for a fixed number of iterations.
Here’s an example:1
2
3
4
5
6
7
8
9
10
11
12
13
14
15
16
17
18
19
20
21import pytest
# Function to benchmark
def expensive_operation():
total = 0
for i in range(1000000):
total += i
return total
# Iteration-based benchmarking test
def test_expensive_operation_iteration(benchmark):
iterations = 100
total_time = 0
for _ in range(iterations):
start_time = benchmark.timer()
result = expensive_operation()
end_time = benchmark.timer()
total_time += end_time - start_time
avg_time_per_iteration = total_time / iterations
print(f"Avg time per iteration: {avg_time_per_iteration:.6f} seconds")
In this example, we manually run the expensive_operation function in a loop for a fixed number of iterations.
We use the benchmark.timer() method to measure the time for each iteration.
After the loop, we calculate the average time per iteration.
In summary, time-based benchmarking is easier to set up and provides automatic statistics.
For iteration-based benchmarking, you need to manually implement the timing measurements, but it allows you to understand code performance within a fixed iteration context.
Pytest Benchmark — Pedantic mode
For you advanced users out there, Pytest benchmark also supports Pedantic mode i.e. higher level of customisation.
Most people won’t require it but if you feel the itch to tinker you can customise it like this1
2
3
4
5
6
7
8
9benchmark.pedantic(
target,
args=(),
kwargs=None,
setup=None,
rounds=1,
warmup_rounds=0,
iterations=1
)
Docs can be found here.
Pytest Benchmark — Impact Of Dependencies?
What if you have some input that takes a long time to read or some pre-compute function, does it affect your benchmarking results?
No, according to docs, Pytest benchmark only benchmarks the callable function that’s passed to it so any pre-compute task that’s done outside of the callable function does not affect your benchmark result.
Save And Compare Benchmark Results
Save
Benchmarking is super useful by itself.
But imagine how helpful would it be to actually know you’re making progress, without manually keeping track of code version’s performance.
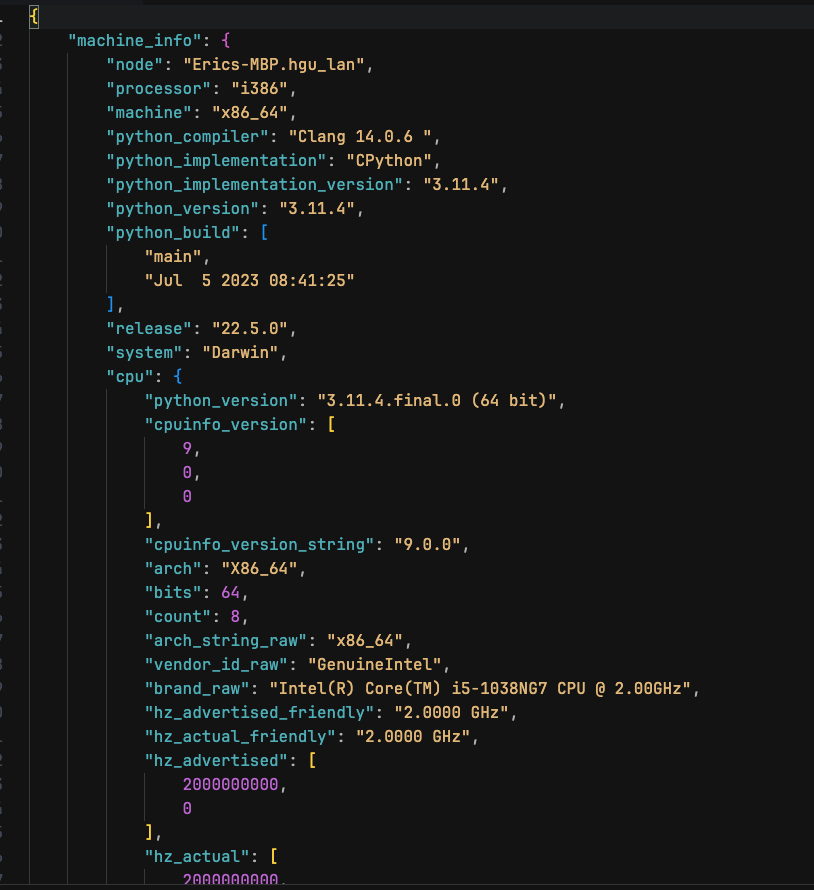
Pytest benchmark has the option to auto-save your test results in JSON files, which can then be loaded into an analytics tool for comparison.
Let’s see how to do this.
Running the below command will automatically save the results to the .benchmarks folder.1
pytest -m sort_large --benchmark-autosave

You can even set your own file name using the — benchmark-save=run1 command.


This is very helpful and helps you keep track of different runs, thus allowing you to iterate and improve your code execution.
From here on, you can save that to Excel or a warehouse to share with colleagues.
Compare
Comparing past executions can nicely be done in the terminal using the command1
pytest-benchmark compare 0001 0002

Conclusion
To conclude, let’s review all that you learnt in this article.
We covered the importance of benchmarking your code and how to leverage Pytest benchmark to compare function performance.
After briefly touching on Big-O notation we went on to a practical use case, exploring 3 sorting algorithms (bubble sort, insertion sort and quick sort).
You then learned how to analyze the benchmark results and various metrics.
Lastly, you explored the difference between time-based and iteration-based benchmarking and how to save and compare benchmark results.
The value of Pytest benchmark cannot be understated and when leveraged correctly can prove immensely helpful in analyzing the performance of your algorithms and code.
As such, I highly encourage you to explore and incorporate Pytest benchmark it into your Python testing workflows.
If you have ideas for improvement or like for me to cover anything specific, please send me a message via Twitter, GitHub or Email.
Till the next time… Cheers!
