Ultimate Guide To Pytest Markers And Good Test Management
As a software developer, you likely manage many tests. Especially as your code grows. It gets harder to track and organize these tests.
The real challenge isn’t just running the tests, but ensuring they adapt to changes during the project lifecycle and become easier to manage.
So how do you manage so many tests and choose what to run? How do you ensure tests are run in the right order?
How do you skip tests under certain conditions? How do you run tests on specific platforms? How do you run tests with different data sets?
All of these questions have been addressed and solutions built into Pytest.
Amidst these challenges emerges a savior: Pytest Markers. These markers are unique to the Pytest system. They are more than just labels; they are what make test management work well.
Pytest markers offer you a flexible and powerful set of tools to meet all your testing needs. They can tag tests based on functionality, choose the order in which they run, or parameterize data sets.
In this article, we’ll delve into Pytest markers, exploring their capabilities in detail.
Through real-life examples, expert insights, and practical exercises, you’ll learn how to integrate these markers into your tests. By the end, challenges will transform into opportunities.
So let’s begin.
All the example code in this article will be in this repository.
What You’ll Learn
In this article, you’ll learn:
- What are Pytest Markers and how to use them
- How to leverage in-built Pytest Markers for efficient test management
- How to define your own custom Pytest Markers
- How to combine multiple Pytest Markers and group tests
- Limitations of Pytest Markers and how to overcome them
What are Pytest Markers?
Pytest markers are a powerful feature that allows you to add metadata or labels to your test functions, making it easier to organize and customize your test suite.
Markers help you categorize and select specific tests to run, especially when dealing with large test suites.
They can be used to indicate test priority, skip certain tests under specific conditions, or group tests by categories like performance, integration, or acceptance.
Here’s a simple example to illustrate the use of Pytest markers:
Suppose you have a test suite for a web application and you want to mark tests as “smoke tests” for quick, essential checks and “regression tests” for comprehensive testing. You can define markers using the @pytest.mark.MARKER like this:1
2
3
4
5
6
7
8
9
10
11
12
13
14
15
16import pytest
def test_homepage_loads():
# Test to check if the homepage loads quickly
assert ...
def test_login_successful():
# Test to check if the login process works as expected
assert ...
def test_user_profile_update():
# Test to check if user profile updates are saved correctly
assert ...
You can then use markers to run specific types of tests using the -m flag, for instance:1
2pytest -m smoke # Run only smoke tests
pytest -m regression # Run only regression tests
Pytest markers provide a flexible way to manage and execute tests based on their attributes, making test suites more efficient and maintainable.
Now you may have used some built-in markers like skip or xfail in your tests. But did you know you can create your own custom markers?
There’s also @pytest.mark.asyncio for testing asynchronous code and @pytest.mark.parametrize for parameterizing tests.
We’ll cover more about built-in and custom markers and their differences in subsequent sections.
Project Setup
Here is the project structure of our example code which contains various tests with different markers:1
2
3
4
5
6
7
8
9
10
11
12
13
14
15
16
17
18
19
20
21
22
23.
├── .gitignore
├── README.md
├── pytest.ini
├── requirements.txt
└── tests
├── calculator.py
├── celery_test
│ ├── my_tasks.py
│ └── test_celery.py
├── test_asyncio.py
├── test_benchmark.py
├── test_combined.py
├── test_custom.py
├── test_fixtures.py
├── test_grouping.py
├── test_hooks.py
├── test_parametize.py
├── test_skip_skipif.py
├── test_speed.py
├── test_timeout.py
├── test_xdist.py
└── test_xfail.py
To get started, clone the Github repo here.
Prerequisites:
- Python 3.12+
Create a virtual environment and install any requirements by using the command below:1
pip install -r requirements.txt
Common Built-in Pytest Markers
Pytest offers several built-in markers that simplify the organization and execution of tests in your test suite.
These markers provide metadata for your test functions, allowing you to customize how tests are collected and run. Here are some common built-in pytest markers:
Pytest Skip Test / Skip If
1 |
This marker skips the annotated test with an optional reason, useful for temporarily excluding tests that are known to be failing or not yet implemented. You can read more about the best way to skip tests here.
Let’s take a look at an example in test_skip_skipif.py:1
2
3
4
5
6
7
8
9
10
11
12
13
14
15import pytest
import sys
# A test that will always be skipped.
def test_example_skip():
assert 2 + 2 == 4
# A test that will be skipped if it's run on a Python version earlier than 3.8.
def test_example_skipif():
assert 3 * 3 == 9
In the above code:
test_example_skip: This test uses the@pytest.mark.skipmarker and will always be skipped regardless of conditions. The given reason, “This test is temporarily disabled,” provides context on why it’s being omitted.test_example_skipif: Here, we’re using the@pytest.mark.skipifmarker to conditionally skip the test. Specifically, the test will be skipped if it’s executed on a Python version earlier than 3.8. This is a useful way to ensure tests are only run in environments where they’re applicable.
Running the test will produce this result:1
pytest tests/test_skip_skipif.py -v -s

You’ll see that 1 test was skipped because we used the skip marker and 1 passed because we’re running a Python version greater than 3.8 or later.
Both markers offer a way to control when and under what conditions tests are executed, enabling better test management.
Pytest Expected Failure (Xfail)
1 |
Marks a test as expected to fail. It’s helpful when you anticipate a test failure, and you can provide an optional reason to explain why it’s expected to fail. This article covers Pytest xfail, xpass and skip in detail.
This is very useful when you have a known bug in your code and you want to track it until it’s fixed.
Let’s take a look at an example in test_xfail.py:1
2
3
4
5
6
7
8
9
10
11
12import pytest
# A test that's expected to fail.
def test_example_xfail():
assert 2 * 3 == 7
# A normal test that's expected to pass.
def test_example_xpass():
assert 3 * 2 == 6
In the provided code, we have two test functions:
test_example_xfail: This test is adorned with the@pytest.mark.xfailmarker, signaling that we anticipate it to fail. The reason? Its assertion checks if2 * 3equals7, which is not true.
When this test fails, pytest recognizes it as an “expected failure,” so it doesn’t negatively impact the overall test outcomes.
test_example_xpass: A straightforward test verifying that3 * 2equals6. As this is accurate, the test is expected to pass successfully.
Running the test will produce this result:1
pytest tests/test_xfail.py -v -s

The key takeaway?
The xfail marker in pytest is a handy tool for categorizing tests that are known to fail, allowing developers to distinguish between unexpected and known failures.
Pytest Parameterization
1 |
This marker allows you to parameterize a test function, running it with different sets of input values specified in the test data. It’s excellent for DRY (Don’t Repeat Yourself) testing, where you avoid redundant test code.
For background on Pytest parameterized testing and how to use it, check out this article.
You can also generate tests as explained in this article.
Let’s take a look at an example in test_parametrize.py:1
2
3
4
5
6
7
8import pytest
# Test function demonstrating the parametrize feature.
# It will run 3 times with different inputs.
def test_addition(test_input, expected):
assert test_input + 2 == expected
In this example, the test_addition function is designed to check if the addition of 2 to the test_input equals the expected value. With the provided parameters, this test will run three times using the different input and expected value pairs.
Running the test will produce this result:1
pytest tests/test_parametrize.py -v -s

The parametrize marker is a powerful tool for parameterizing tests, allowing you to run a single test with multiple input values. This not only reduces redundancy but also enhances the clarity of your test suite.
Pytest Fixtures
1 |
This marker applies one or more fixtures to a test function.
Pytest Fixtures help share common test data and logic across multiple tests, reducing code duplication and improving test maintainability.
Fixtures also provide setup and teardown logic for your tests, and this marker is a convenient way to specify which fixtures a test function should use.
Let’s look at an example in test_fixtures.py:1
2
3
4
5
6
7
8
9
10
11
12
13
14import pytest
# A fixture returning a sample database entry.
def database_data():
return {"username": "Alice", "password": "password123"}
# Test function using the database_data fixture.
def test_database_entry(database_data):
assert database_data["username"] == "Alice"
assert database_data["password"] == "password123"
Running this test will produce this result:1
pytest tests/test_fixtures.py -v -s

Custom Pytest Markers
Mark Tests as Fast or Slow
Pytest isn’t all about using what’s provided – it’s largely about customization. There are many built-in markers, but sometimes your project needs custom solutions.
We can easily define our own markers for example, to mark tests as fast or slow or external, internal etc.
Let’s explore the example code in test_speed.py1
2
3
4
5
6
7
8
9
10
11
12
13
14
15
16
17
18
19
20
21
22
23
24import pytest
import time
from calculator import Calculator
# Importing a hypothetical Calculator class from
# calculator module.
# Marked as a 'fast' test, this function tests the addition method of the Calculator.
def test_fast_add():
calc = Calculator() # Creating an instance of the Calculator class.
result = calc.add(2, 2) # Using the add method to add two numbers.
assert result == 4 # Asserting that the result is correct.
# Marked as a 'slow' test due to the intentional delay, this function tests the
# subtraction method of the Calculator.
def test_slow_subtraction():
time.sleep(5) # Introducing a delay of 5 seconds to simulate a slow test.
calc = Calculator() # Creating an instance of the Calculator class.
result = calc.subtract(10, 5) # Using the subtract method to subtract two numbers.
assert result == 5 # Asserting that the result is correct.
In this example, we have two test functions: test_fast_add and test_slow_subtraction.
test_fast_add: This test is marked asfastbecause it’s expected to run quickly. It tests theaddmethod of theCalculatorclass, which adds two numbers. The assertion checks if the result is correct.test_slow_subtraction: This test is marked asslowbecause it’s expected to run slowly. It tests thesubtractmethod of theCalculatorclass, which subtracts two numbers. The assertion checks if the result is correct. This test is fitted with a 5-second delay to simulate a slow test.
These tests are totally hypothetical, but they illustrate how you can use custom markers to categorize tests based on their expected execution time.
Running the test will produce this result:1
pytest tests/test_speed.py -m slow -v -s
You’ll see that only the slow test was executed.
Alternatively, you can run the fast test with:1
pytest tests/test_speed.py -m fast -v -s
and so on.

This selective execution of tests is a powerful feature of Pytest, allowing you to tailor your test suite and its execution.
Pytest Timeout
1 |
Specifies a maximum execution time for a test. If the test runs longer than the specified timeout, it’s automatically marked as a failure. This is useful for preventing tests from running indefinitely.
Please note you’ll need to install the pytest-timeout plugin to use this marker.
Read this article on Pytest timeout for more details.
Here’s a simple example in test_timeout.py:1
2
3
4
5
6
7
8
9import pytest
import time
# A Slow Running Test that's expected to timeout.
def test_timeout():
time.sleep(15)
assert 2 * 3 == 6
In this example, we have a test function that’s expected to run for 10 seconds. However, the test itself takes 15 seconds to complete.
Running the test will produce this result:

Pytest Run Order
1 |
Allows you to control the order in which tests are executed. The order argument specifies the relative execution order of tests.
These built-in pytest markers enhance the flexibility and manageability of your test suite, making it easier to skip, prioritize, parameterize, and customize the behavior of your tests according to your project’s specific needs.
You can explore Pytest run order examples in depth here in the docs. Note that this marker also requires the pytest-order plugin to work.
Combining Multiple Markers
Sometimes one marker isn’t enough. But can you use more than one marker on a test? Let’s explore.
In test_combined.py1
2
3
4
5
6
7
8
9import pytest
def test_combined_markers():
assert 1 + 1 == 2
def test_no_markers():
assert 1 + 1 == 2
In this example, we have a test function decorated with two markers: marker1 and marker2.
We also have a test function with no markers.
Running the test with the below CLI command1
pytest -m marker1 -m marker2 tests/test_combined.py -v -s
We get,

You can see that only the test with both markers was executed.
Grouping Tests
One of the main challenges in large projects is managing a growing suite of tests. The solution? Grouping!
Grouping tests is about more than just organization—it’s a strategy for achieving speed, clarity, and efficiency. Thoughtfully categorizing tests based on various criteria ensures a streamlined, coherent, and manageable test suite.
The power of pytest markers lies in their ability to neatly categorize tests. By applying specific markers to tests, you can easily filter and run a subset of your test suite, enabling targeted testing based on your current needs.
Consider the following example in test_grouping.py:1
2
3
4
5
6
7
8
9
10
11
12
13
14
15
16
17
18
19
20
21
22
23
24
25
26
27
28
29
30
31
32
33
34
35import pytest
# Define custom markers
pytestmark = [
pytest.mark.login,
pytest.mark.signup
]
# First test for login functionality
def test_login_valid_user():
username = "valid_user"
password = "valid_pass"
assert username == "valid_user" and password == "valid_pass"
# Second test for login functionality
def test_login_invalid_user():
username = "invalid_user"
password = "valid_pass"
assert username != "valid_user" and password == "valid_pass"
# First test for signup functionality
def test_signup_new_user():
new_username = "new_user"
new_password = "new_pass"
assert new_username == "new_user" and new_password == "new_pass"
# Second test for signup functionality
def test_signup_existing_user():
existing_username = "existing_user"
assert existing_username == "existing_user"
How to Run the Tests:
To run all tests marked as login, execute:1
pytest -v -m login tests/test_grouping.py -v -s
To run tests marked as signup, use:1
pytest -v -m signup tests/test_grouping.py -v -s
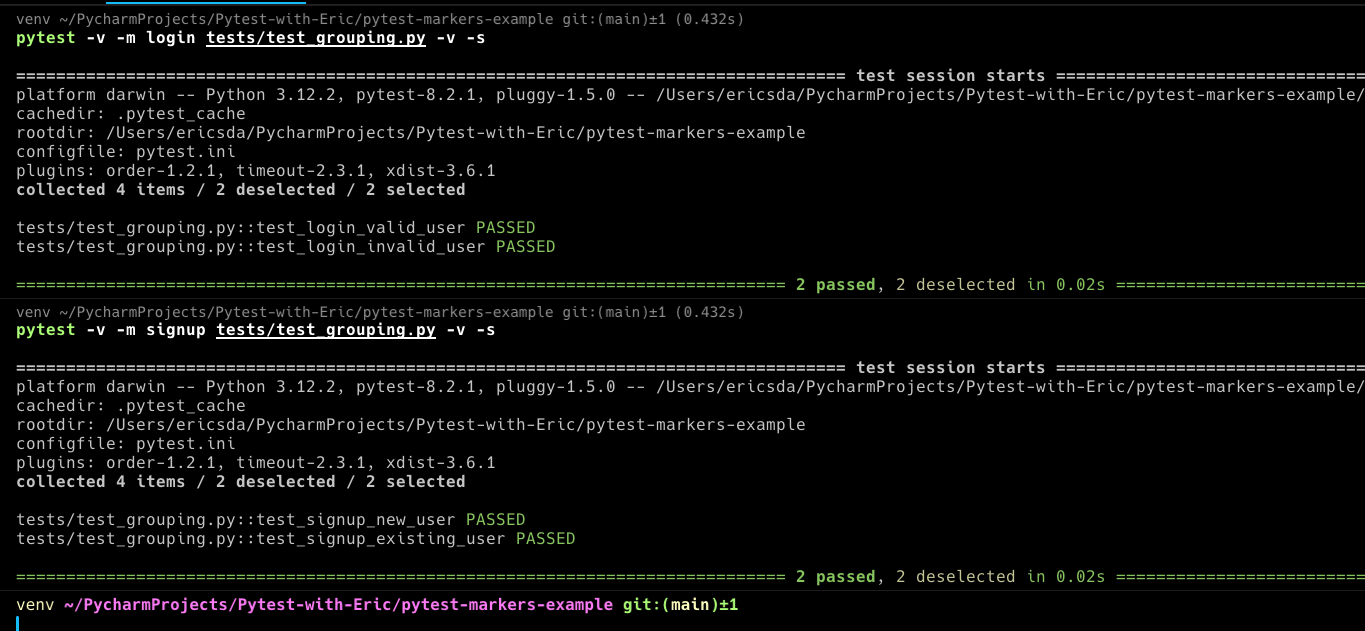
With multiple tests under each marker, this example provides a clearer picture of how markers can be effectively used to group and selectively run tests in pytest.
Best Practices When Using Pytest Markers
Define Markers in Pytest.ini File
The pytest.ini file plays a central role when working with Pytest.
It’s a configuration file that allows developers to set default behaviors, modify existing ones, set environment variables, verbose logging and define custom settings for pytest runs.
Think of it as the control center for your Pytest operations.
Whether you’re defining default command line arguments or setting up custom markers, pytest.ini provides a structured way to manage those configurations especially Pytest Markers.
Defining what your Pytest markers are and how they should be used in the pytest.ini file is a best practice. Without it, you risk confusion and misuse of markers.
For a deeper dive into all the capabilities and nuances of this configuration file, check out this detailed article.
An example pytest.ini file:1
2
3
4
5
6
7
8
9
10
11
12
13
14
15
16
17
18[pytest]
markers =
development: marks tests as development (deselect with '-m "not development"')
production: marks tests as production (deselect with '-m "not production"')
fast: marks tests as fast (run with '-m fast')
slow: marks tests as slow (run with '-m slow')
custom: custom marker example (run with '-m custom')
asyncio: marks tests requiring asyncio (run with pytest-asyncio plugin)
xfail: marks tests that are expected to fail (handled by pytest itself)
xpass: marks tests that unexpectedly pass after being marked xfail (handled by pytest itself)
parameters: marks parameterized tests (handled by pytest itself)
benchmark: marks tests used for benchmarking (handled by pytest-benchmark plugin)
celery: marks tests related to Celery tasks (custom marker, specifics depend on test implementation)
login: dummy login marker for grouping test
signup: dummy signup marker for grouping test
marker1: combined markers
marker2: combined markers
timeout: test with timeout
One of the foundational steps to mastering pytest markers is understanding what they are and their place in the pytest ecosystem.
At its core, a marker is a label you attach to a test function to categorize or customize its behavior.
Think of them as tags that help you filter, modify, or provide specific instructions for your tests.
For instance, you can mark certain tests to be skipped under specific conditions or designate some to run only on a particular platform.
This ability not only streamlines the testing process but also ensures that the right tests are executed in the right scenarios.
As you get comfortable with basic markers, you’ll find they open up a world of possibilities in managing and optimizing your tests.
In the world of testing, pytest markers are like guideposts.
They’re labels for your tests, helping you categorize or choose when to run them. Simply put, they organize your tests to run as needed.
The Other Side: Limitations of Pytest Markers
Just as a brilliant gem might have its flaws, pytest markers, for all their utility, come with their own set of constraints.
Delving into the Limitations:
Confusion with Undefined Markers : One of the more common issues users encounter is the
UnknownMarkWarning. If you accidentally mistype a marker or use one that hasn’t been registered, pytest will throw this warning. It’s a reminder to either register the marker in your pytest configuration or fix a potential typo.Overhead with Too Many Custom Markers : The flexibility of creating custom markers is a double-edged sword. While it allows categorization of tests, overuse can lead to a cluttered test suite, making it hard for developers to understand or maintain the code.
Potential for Misuse : Since markers can control test behavior, there’s room for misuse. For example, over-relying on markers like
skiporxfailwithout proper justification can lead to important tests being overlooked.Interoperability with Other Tools : Not all tools and plugins that integrate with pytest might fully support or understand all custom markers. This could lead to unexpected behavior when integrating your tests with other systems.
While these limitations exist, they aren’t insurmountable. A few best practices can help:
- Document Custom Markers : Always maintain a list of custom markers and their intended use. This aids new team members and provides clarity.
- Regularly Review Marked Tests : Periodically check tests with
skiporxfailmarkers to determine if they’re still relevant. - Stay Updated : As pytest and its ecosystem evolve, some limitations might be addressed in newer versions. Ensure you keep your dependencies updated.
- Install Plugins : Plugins like
pytest-orderandpytest-timeoutcan help add functionality to your tests. However, they might not be compatible with all pytest versions. Check the documentation to ensure compatibility and ensure to include all plugins in yourrequirements.txtfile.
With a clear understanding of these constraints and proactive management, pytest markers remain a powerful tool in a tester’s toolkit.
Conclusion
Throughout this article, we journeyed through the vast landscape of pytest markers.
We have seen how they can improve the testing process, from understanding their basics to using their advanced features.
With real-world examples, the potential of pytest markers becomes evident. They’re not just tools but powerful allies in the quest for impeccable software.
We covered several topics, including: built-in and custom markers, combining multiple markers, grouping tests, best practices in defining markers and the limitations of pytest markers.
Now it’s time to put your knowledge to the test and explore the possibilities of pytest markers.
Remember, the key lies not just in knowledge but in its application. As Python developers, we’re equipped with an incredible toolkit. It’s up to us to harness it to its full potential. Happy testing!
If you have any ideas for improvement or like me to cover any topics please comment below or send me a message via Twitter, GitHub or Email.
Till the next time… Cheers!
Additional Reading:
- Example Code Used
- Pytest Markers Official Documentation
- Pytest Markers Examples
- What Is
pytest.iniAnd How To Save Time Using Pytest Config - How To Avoid Hanging Tests Using Pytest Timeout (And Save Compute Resource)
- What is Setup and Teardown in Pytest? (Importance of a Clean Test Environment)
- How Pytest Fixtures Can Help You Write More Readable And Efficient Tests
- A Beginner’s Guide To
pytest_generate_tests(Explained With 2 Examples) - How to Effortlessly Generate Unit Test Cases with Pytest Parameterized Tests
- An Ultimate Guide To Using Pytest Skip Test And XFail - With Examples