What is Setup and Teardown in Pytest? (Importance of a Clean Test Environment)
Running tests with Pytest is straightforward for simple programs. However, things get a bit tricky when your program relies on pre-setup tasks like database initlializations, external network calls, or complex objects.
While these tasks are a simple, handling them in your tests may seem less intuitive. So, how can you tackle this challenge in your testing process?
How do you ensure that tests run in an isolated environment, without interference from other tests while also handling resource set up?
The answer - Pytest setup and teardown mechanisms!
Pytest setup and teardown allows you to spin up resources for the duration of testing and tear them down afterwards.
This is incredibly useful for handling items like database connections, sharing classes or complex JSON objects across tests in the form of fixtures or other.
In this article, we’ll take a deep dive into the importance of setup and teardown in Pytest. We’ll also understand 2 different ways to teardown resources - yield and addfinalizer methods.
Then, we’ll demonstrate practical applications and understand how to use Pytest setup and teardown using a sample project.
Let’s get started!
What is Setup and Teardown?
In the domain of testing, setup and teardown refer to the preparation and cleanup activities that you may require to execute dependent tests.
Setup allows you to create and configure necessary resources and conditions for tests like initializing required classes, database or network connections, defining test objects, fixtures or variables and so on.
It lets you ensure that the test environment is ready for the specified test.
While Teardown helps you clean and reset the resources and configurations created using Setup. Simply put, it means to gracefully terminate the changes in the environment that you made to execute your test code.
The most flexible and powerful setup/teardown mechanism in Pytest is the fixture system. We’ll discuss fixtures and ways to setup and teardown using fixtures in the following sections.
For now, let’s learn WHY setup and teardown are important in Unit Testing.
Importance of Test Setup and Teardown
Setup and teardown are essential concepts of unit testing that play a crucial role in writing effective and maintainable test suites. Here’s why they are a programmer’s ultimate weapon:
Isolation of Tests: Setup and teardown create a clean and isolated environment for each test function or method, ensuring that the state of one test does not interfere with that of the another.
Resource Management: Whether you need to establish database connections, work with temporary files, or manage complex dependencies, these methods provide a structured way to allocate and release resources. This prevents resource leaks and conflicts between tests.
Teardown for Clean-Up: The teardown method is useful for cleaning up resources like database transactions, temporary files, or memory allocations. This prevents resource leaks that negatively impact test performance.
Test Order Independence: Pytest enables you to write tests that are independent of execution order. Properly managed setup and teardown code support this goal by resetting the environment between tests, allowing you to execute tests in any order.
As you continue reading, you’ll learn how to use the Pytest setup and teardown methods, understand how it helps create a robust, reliable, and maintainable test suite.
What You’ll learn
By the end of this article, you should be able to:
- Understand the importance and use of setup and teardown in testing.
- Run tests using fixture setup and teardown.
- Explore 2 ways to teardown resources -
yieldandaddfinalizermethods. - Implement setup and teardown in a sample project.
Example Code Setup
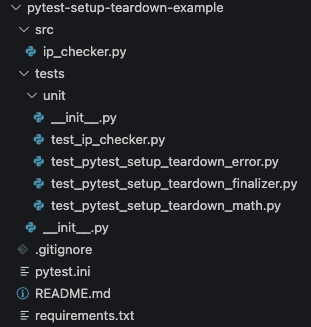
Here’s our project structure:

To get started clone the Github Repo here, or you can create your own repo by creating a folder and running git init to initialize it.
In this project, we’ll be using Python 3.11.4.
Create a virtual environment and install any requirements (packages) using1
pip install -r requirements.txt
Pytest Setup and Teardown - Fixtures
In Pytest, fixtures are special functions marked with the @pytest.fixture decorator.
They provide a way to set up and tear down resources needed for your tests. If you are not familiar with fixtures, then don’t worry. This detailed guide on fixtures has got you covered!
With fixtures, you can define setup and teardown logic in one place and then reuse it across multiple tests. Fixtures can also have scopes, such as function, class, module, or session, which determine how often the setup and teardown code is executed.
Before we dive into the implementation of these techniques, let’s commit it to memory that any code before yield is the setup, and any code after yield is the teardown.
Let’s take a simple math square function to understand how the pytest setup and teardown works:
tests/unit/test_pytest_setup_teardown_math.py1
2
3
4
5
6
7
8
9
10
11
12
13
14
15
16
17
18
19
20
21
22
23
24import pytest
def calculate_square(x):
return x * x
def setup_data():
data = 5 # Set up a sample number
print("\nSetting up resources...")
yield data # Provide the data to the test
# Teardown: Clean up resources (if any) after the test
print("\nTearing down resources...")
# Test cases
def test_square_positive_number(setup_data):
result = calculate_square(setup_data)
assert result == 25
print("Running test case for positive number")
def test_square_negative_number(setup_data):
result = calculate_square(-setup_data)
assert result == 25 # The square of -5 is also 25
print("Running test case for negative number")
Running the test,1
pytest -v -s
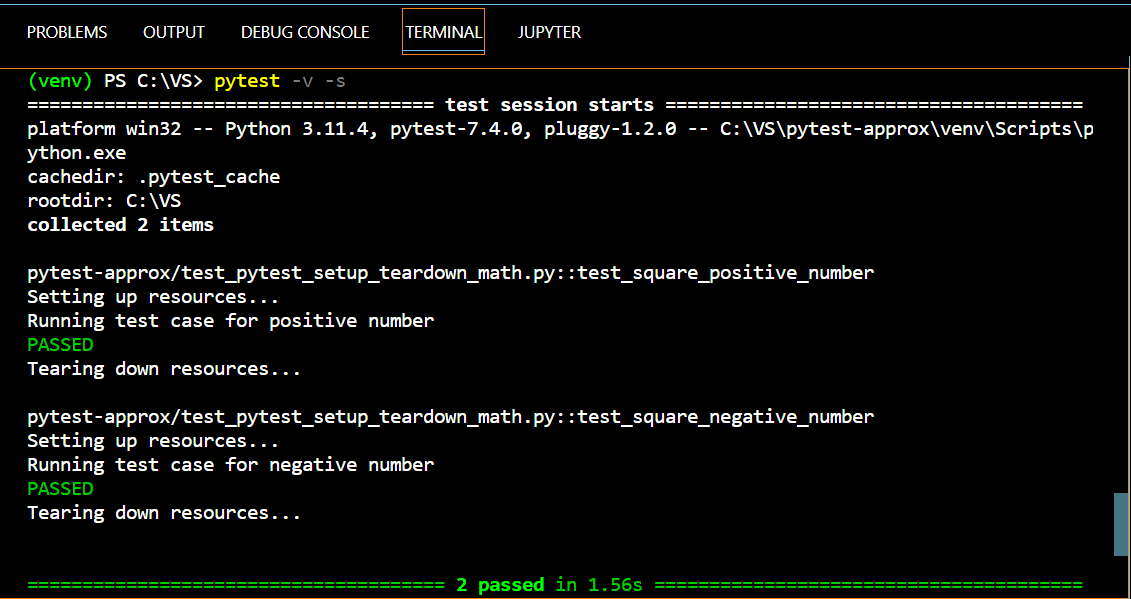
When you run these tests using pytest, it will set up the sample number before each test and tear it down afterwards, ensuring that each test runs in an isolated environment.
As you can see in the output, the sequence of how our code will execute. For each test case, the sample number (i.e. 5) is setup and given as input to the calculate_square function.
We create a setup_data fixture to set up a sample number (5 in this case), yield it to the test functions, and perform teardown by resetting the data.
Using fixtures is generally recommended in pytest because of their flexibility and the ability to explicitly inject dependencies into test functions.
You can control the lifetime of fixtures using the scope parameter which takes values like session, module, function and class. We covered this concept in great length with examples in our article on Pytest fixture scopes.
Different Ways of Teardown
You might wonder why we used the keyword yield?
Well, there are two different ways of teardown available in Pytest. Using the yield fixture and fixture finalization. Let’s talk about them in detail!
Teardown Using yield (recommended)
When utilizing the yield fixture, there’s no need to explicitly define any function or code segment for teardown.
Pytest will automatically employ yield fixtures in teardown, once you use the yield keyword. Like in the code above, yield data is written that will ensure that all the resources are deallocated.1
2
3
4
5
6
7
def setup_data():
data = 5 # Set up a sample number
print("\nSetting up resources...")
yield data # Provide the data to the test
# Teardown: Clean up resources (if any) after the test
print("\nTearing down resources...")
In the above code we use the yield keyword to provide the data to the test. After the test is completed, the teardown code is executed.
Teardown Using Fixture Finalization
The yield method is widely regarded as the preferred and straightforward choice for teardown, as it functions as an automatic cleaner.
However, an alternative method exists for achieving the same result, which involves using the addfinalizer function directly with the test’s request object.
In pytest, .addfinalizer is a method provided by the request object, used to register a finalizer function. It will be executed after the test function that uses the fixture has been completed, regardless of whether the test function passed or failed.
Let’s take the same math square function and see how the structure of fixture finalization differs:
tests/unit/test_pytest_setup_teardown_finalizer.py1
2
3
4
5
6
7
8
9
10
11
12
13
14
15
16
17
18
19
20
21
22
23
24
25
26
27
28
29
30import pytest
def calculate_square(x):
return x * x
def setup_data(request):
print("\nSetting up resources...")
data = 5
# Define a finalizer function for teardown
def finalizer():
print("\nPerforming teardown...")
# Clean up any resources if needed
# Register the finalizer to ensure cleanup
request.addfinalizer(finalizer)
return data # Provide the data to the test
# Test cases
def test_square_positive_number(setup_data):
result = calculate_square(setup_data)
assert result == 25
print("Running test case for positive number")
def test_square_negative_number(setup_data):
result = calculate_square(-setup_data)
assert result == 25 # The square of -5 is also 25
print("Running test case for negative number")
Let’s run the test,1
pytest -v -s
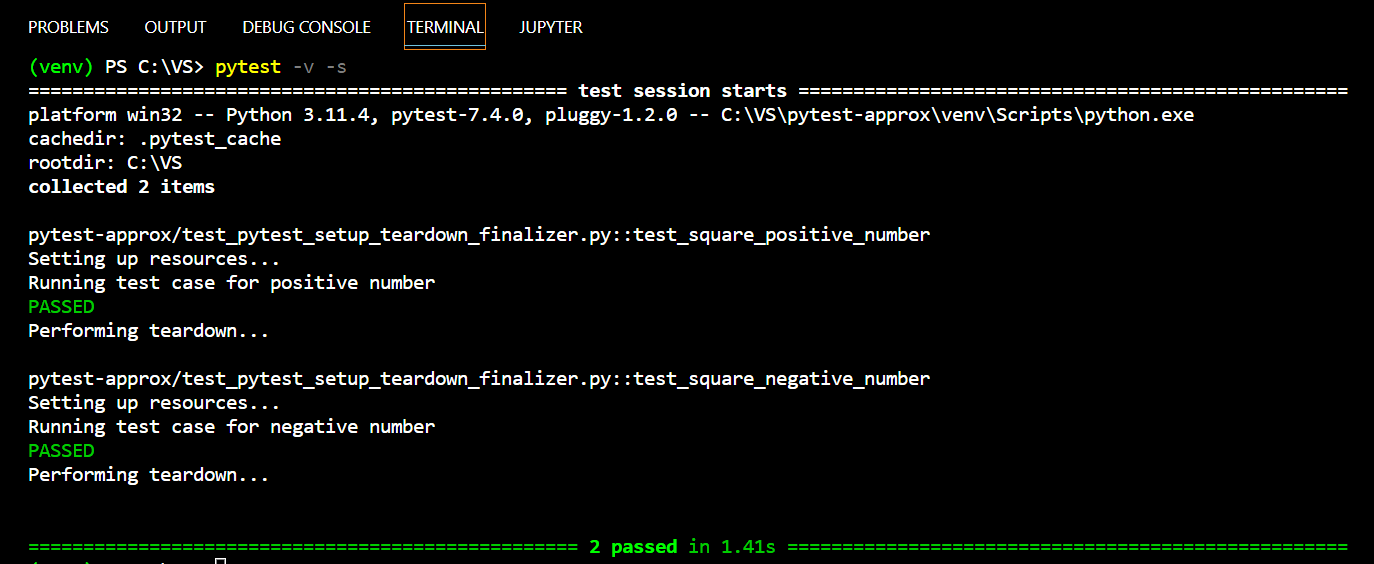
You may notice that we’ve created a separate function finalizer() to teardown or clear the resources. When you run these modified tests using pytest, you will see that the finalizer is executed after each test, even if an exception occurs during the test.
Yield Fixture vs Fixture Finalization
Like everything in programming, there is no one size fits all solution.
Your choice between using yield in pytest fixtures and using fixture finalization is primarily a matter of style and preference, but there are nuances that can influence your decision. Let’s break it down:
Pros of using yield
- It offers a clean, easy-to-read approach to managing both setup and teardown within a single fixture.
- Linear Flow: The flow of setup to teardown is linear, which is often more intuitive.
Cons of using yield
- If you have multiple teardown steps or conditional teardown logic, things can get cluttered.
Pros of using fixture finalization
- It allows you to clearly separate setup and teardown logic.
- If you have multiple or conditional teardown steps, you can easily add multiple finalizers.
Cons of using fixture finalization
- The flow isn’t as straightforward as with yield, as the teardown function is defined before it’s registered.
Recommendation:
Simple Cases: For most simple cases where you have straightforward setup and teardown steps, using yield offers a cleaner and more readable approach.
Complex Cases: If you find that your fixture has multiple teardown steps, or the teardown logic is conditional, or you need finer control, using fixture finalization with request.addfinalizer might be more appropriate.
Another Example - Setup and Teardown
Let’s take a simple IP address validator example to show you how these mechanisms are implemented on a larger scale. Attached below is a code that validates an IP address and finds it’s IP class.
src/ip_checker.py1
2
3
4
5
6
7
8
9
10
11
12
13
14
15
16
17
18
19
20
21
22
23
24
25
26
27
28
29
30
31
32
33
34
35
36
37
38
39
40
41
42
43
44
45
46
47
48
49
50
51
52
53
54
55
56
57
58
59
60
61
62
63
64
65
66
67
68
69
70
71
72
73
74
75
76
77
78
79import re
# Class for Validating IP
class ip_check:
"""
Check the validity and class of an IP address.
:validate_it: Verify the IP address.
:find_class: Find the class of the IP address.
"""
def __init__(self, IP):
self.IP = IP
def validate_it(self):
"""
Check the validity of an IP address..
:param request: IP in string format.
:return: The type of IP address. returns 'Invalid IP' for invalid IP address.
"""
# Regex expression for validating IPv4
regex = "^((25[0-5]|2[0-4][0-9]|1[0-9][0-9]|[1-9]?[0-9])\\.){3}(25[0-5]|2[0-4][0-9]|1[0-9][0-9]|[1-9]?[0-9])$"
# Regex expression for validating IPv6
regex1 = "((([0-9a-fA-F]){1,4})\\:){7}"\
"([0-9a-fA-F]){1,4}"
# Compiling the regex expressions
p = re.compile(regex)
p1 = re.compile(regex1)
# Checking if it is a valid IPv4 address
if (re.search(p, self.IP)):
return "Valid IPv4"
# Checking if it is a valid IPv6 address
elif (re.search(p1, self.IP)):
return "Valid IPv6"
return "Invalid IP"
def find_class(self):
"""
Function to find out the class of an IP address
:param request: IP in string format.
:return: The class of the IP address.
"""
ip = self.IP.split(".")
ip = [int(i) for i in ip]
# If ip >= 0 and ip <= 127 then the IP address is in class A
if(ip[0] >= 0 and ip[0] <= 127):
return "A"
# If ip >= 128 and ip <= 191 then the IP address is in class B
elif(ip[0] >=128 and ip[0] <= 191):
return "B"
# If ip >= 192 and ip <= 223 then the IP address is in class C
elif(ip[0] >= 192 and ip[0] <= 223):
return "C"
# If ip >= 224 and ip <= 239 then the IP address is in class D
elif(ip[0] >= 224 and ip[0] <= 239):
return "D"
# Otherwise the IP address is in Class E
else:
return "E"
def delete_objects(self):
"""
function to delete itself
"""
del self
Here, the function validate_it() validates an IP address, and the function find_class() finds the class of an IP address.
If you want to learn more about IP addresses and how they are validated, then give this article a read.
Test Code - yield fixtures
Now our program is ready. It’s time for testing!
For testing our code, we created a simple test code as follows,
tests/unit/test_ip_checker.py1
2
3
4
5
6
7
8
9
10
11
12
13
14
15
16
17
18
19
20
21
22
23
24
25
26
27
28
29
30
31
32
33from src.ip_checker import (ip_check)
import pytest
# Function to initialize setup
def ip_test_config(request) -> tuple:
print("Running setup method...")
ip = ip_check("257.120.223.13")
ip1 = ip_check("127.0.0.0")
yield ip, ip1
# Teardown code after yield
ip.delete_objects()
ip1.delete_objects()
# Function to test the validate_it function
def test_validity(ip_test_config) -> None:
ip, ip1 = ip_test_config
print("Running test_validity...")
assert ip.validate_it() == "Invalid IP"
assert ip1.validate_it() == "Valid IPv4"
# Function to test the find_class function
def test_find_class(ip_test_config) -> None:
ip, ip1 = ip_test_config
print("Running test_find_class...")
assert ip.find_class() == "E"
assert ip1.find_class() == "A"
The output will look something like this:1
pytest -v -s
Here pytest.fixture is used to define a fixture named ip_test_config. This fixture is responsible for setting up instances of the ip_check class for testing.
Inside the ip_test_config fixture, two instances of ip_check are created with different IP addresses: one with an invalid IP (“257.120.223.13”) and one with a valid IPv4 address (“127.0.0.0”).
The yield statement provides these instances to the test functions, and after the test functions have run, the teardown code is executed.
Let’s try another way to do the same thing.
Test Code - Adding finalizers directly
We already discussed how fixture finalization is used above. Now let’s focus on how we can implement IP validator using this.
tests/unit/test_ip_checker.py1
2
3
4
5
6
7
8
9
10
11
12
13
14
15
16
17
18
19
20
21
22
23
24
25
26
27
28
29
30
31
32from src.ip_checker import (ip_check)
import pytest
def ip_test_config_using_addfinalizer(request) -> tuple:
print("Running setup method...")
ip = ip_check("257.120.223.13")
ip1 = ip_check("127.0.0.0")
# Function to clear the resources
def clear_resource():
print("Running the teardown code")
ip.delete_objects()
ip1.delete_objects()
request.addfinalizer(clear_resource)
return ip, ip1
# Function to run test with setup and teardown using addfinalizer
def test_ip_with_addfinalizer(ip_test_config_using_addfinalizer) -> None:
ip, ip1 = ip_test_config_using_addfinalizer
print("Testing the validity...")
assert ip.validate_it() == "Invalid IP"
assert ip1.validate_it() == "Valid IPv4"
print("Testing the class...")
assert ip.find_class() == "E"
assert ip1.find_class() == "A"
The output will look something like this:1
pytest -v -s
Instead of using yield, this approach defines a separate function called clear_resource to perform the teardown actions (calling delete_objects on the ip_check instances).
The request.addfinalizer(clear_resource) statement registers the clear_resource function as a finalizer that will be called after the test has been completed.
Conclusion
In this article, we explored the importance and uses of setup and teardown in Unit Testing.
We first understood what setup and teardown is, and how they can hugely benefit your testing process, especially when dealing with complex testing dependencies to ensure test isolation.
Next, you learned how to use fixtures to control setup teardown using the yield keyword and addfinalizer methods.
Lastly, you applied these concepts in a hands-on manner (IP validator) to understand how Pytest’s setup and teardown functions can be applied in real-world scenarios.
In summary, Pytest’s setup teardown functionality empowers you to create customized testing environments.
It’s an indispensable tool for managing resources when conducting tests with Pytest, offering a level of control that is unmatched by alternative methods.
I encourage you to go ahead and test it out on your own. Once you realise its potential you’ll be mind-blown and handling dependency setup will be a breeze.
If you have ideas for improvement or would like me to cover anything specific, please send me a message via Twitter, GitHub or Email.
Additional Links
- https://www.freecodecamp.org/news/how-to-write-unit-tests-for-instance-methods-in-python/
- https://www.youtube.com/watch?v=JJmTO95AoqE
- https://stackoverflow.com/questions/26405380/how-do-i-correctly-setup-and-teardown-for-my-pytest-class-with-tests
- https://hackmd.io/@jenc/SJYmGcKsK
- https://elizabethzagroba.com/posts/2022/07_30_the_power_of_separating_setup_and_teardown_from_your_tests/


